Administrator Guide
This guide outlines the roles, responsibilities, and key tasks for administrators managing a fincore loan application system.
Administrator Roles & Responsibilities
Primary Functions
- Monitor and manage loan applications from submission to disbursement
- Verify applicant information and documentation
- Approve or reject loan requests based on policies
- Manage user accounts and access permissions
- Generate reports and analytics
- Handle customer queries and disputes
- Ensure compliance with regulations
1.Administrator Guide – Customer Management
Purpose
The Customers module allows administrators to manage borrower details and view complete customer information.
Navigation
Menu: Customers → Customers
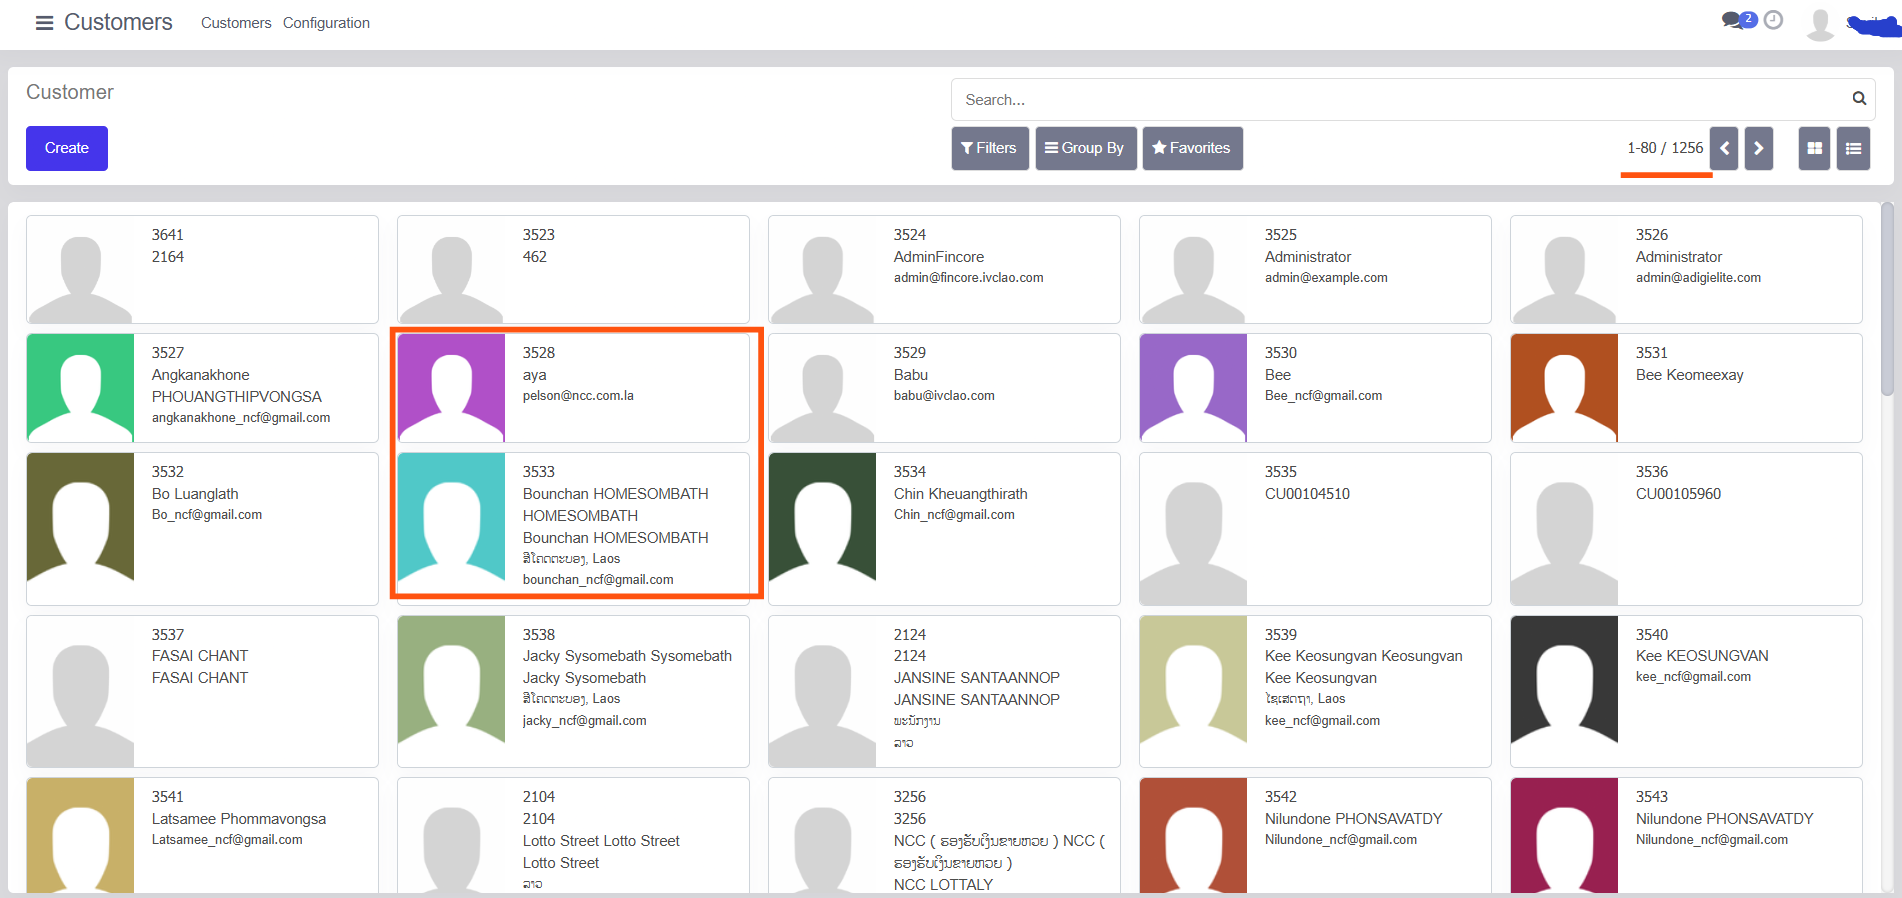
1.1Customer List View
In list/card view, administrators can see:
- Customer ID
- Name
- Profile image
This view is useful for quickly locating customers.
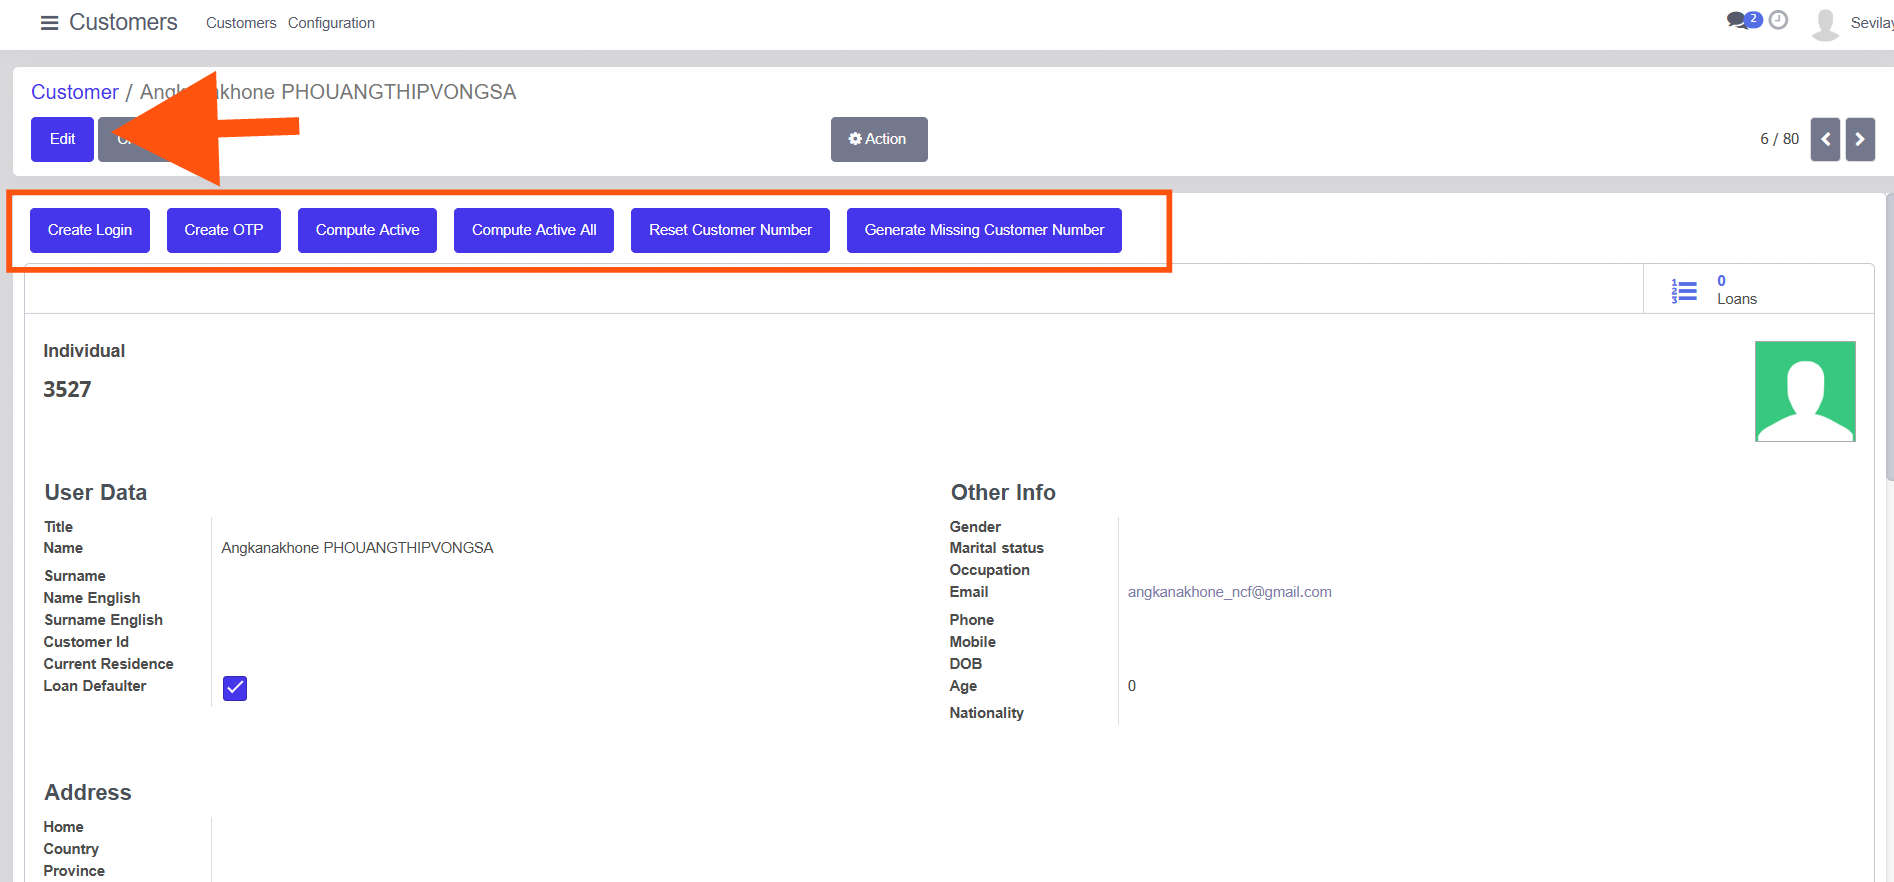
1.2. Customer Form View – Detailed Information
Clicking on a customer opens the Form View, which shows detailed information.
Top Action Buttons
- Create Login – Create system login for customer
- Create OTP – Generate OTP
- Compute Active / Compute Active All – Update customer status
- Reset Customer Number – Reset ID
- Generate Missing Customer Number – Auto-generate missing IDs
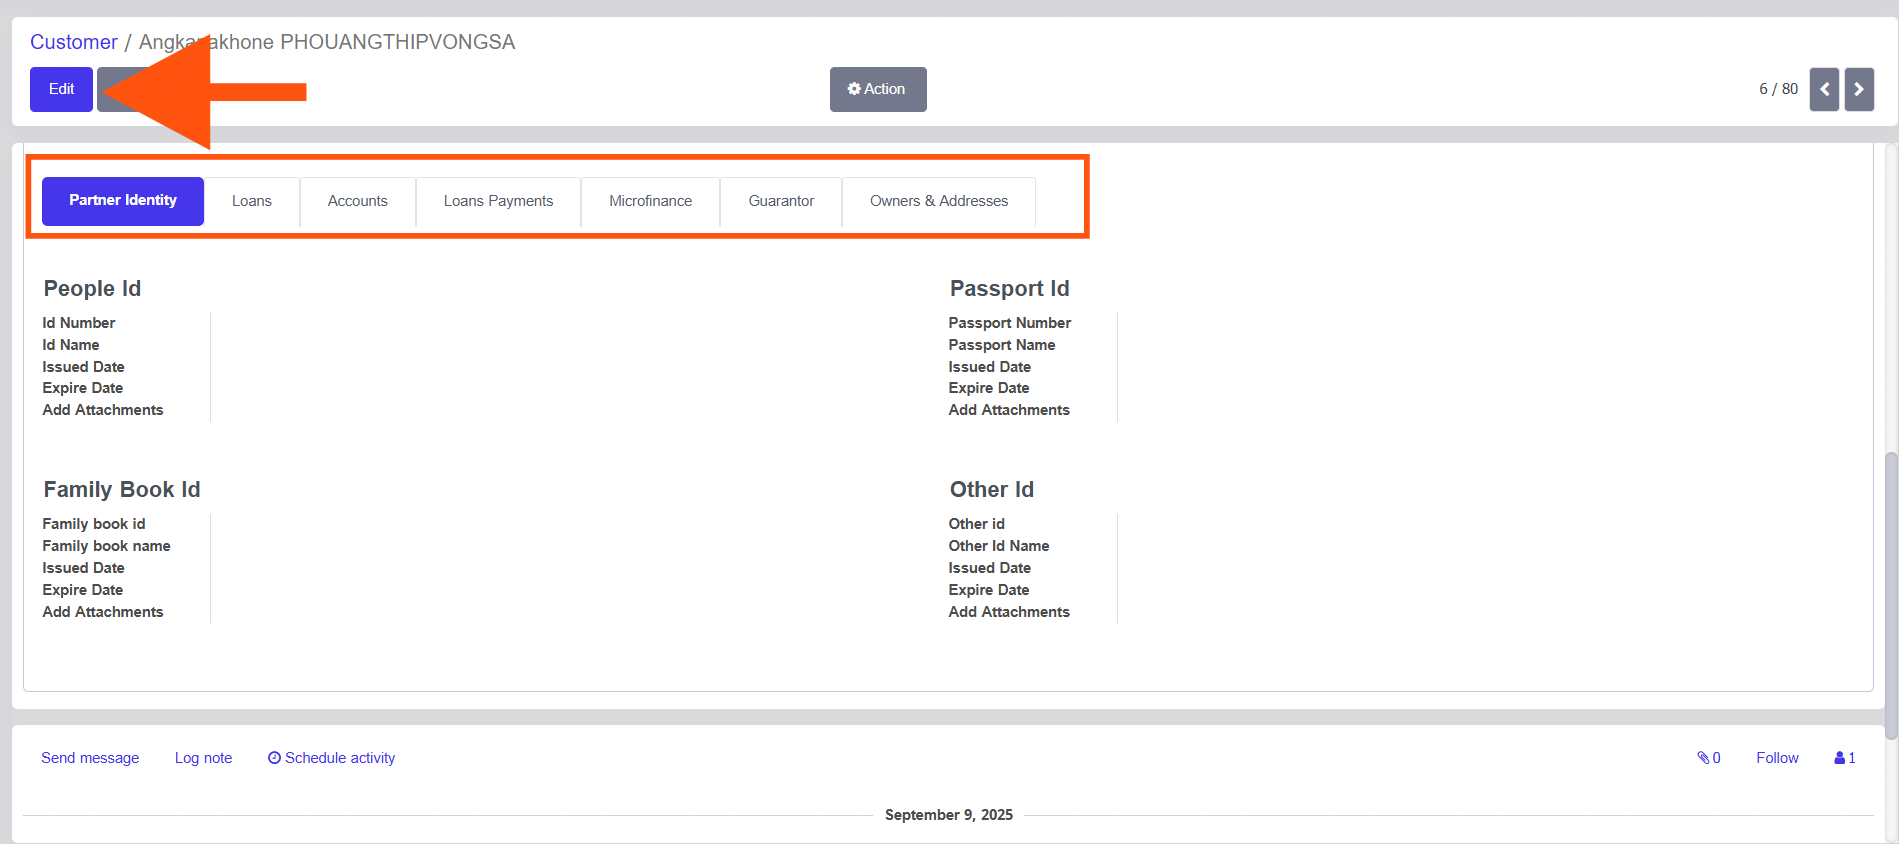
Tabs Available
- Partner Identity – Personal identification details
- Loans – All loans linked to the customer
- Accounts – Financial accounts
- Loan Payments – Payment history
- Microfinance – Microfinance-related data
- Guarantor – Guarantor details
- Owners & Addresses – Address and ownership info
Identification Sections
- People ID
- Passport ID
- Family Book ID
- Other ID
Each section supports:
- Issue Date
- Expiry Date
- Attachments
2.Administrator Guide – Loan Management
This guide explains how an Administrator can view, verify, and track loan requests and their statuses from the Loans module.
2.1. Accessing the Loan Request Page
- Log in as Administrator.
- Go to the top menu and click Loans.
- Select Loan Request from the submenu.
This opens the Loan Request list view, where all loan records in the system are displayed.
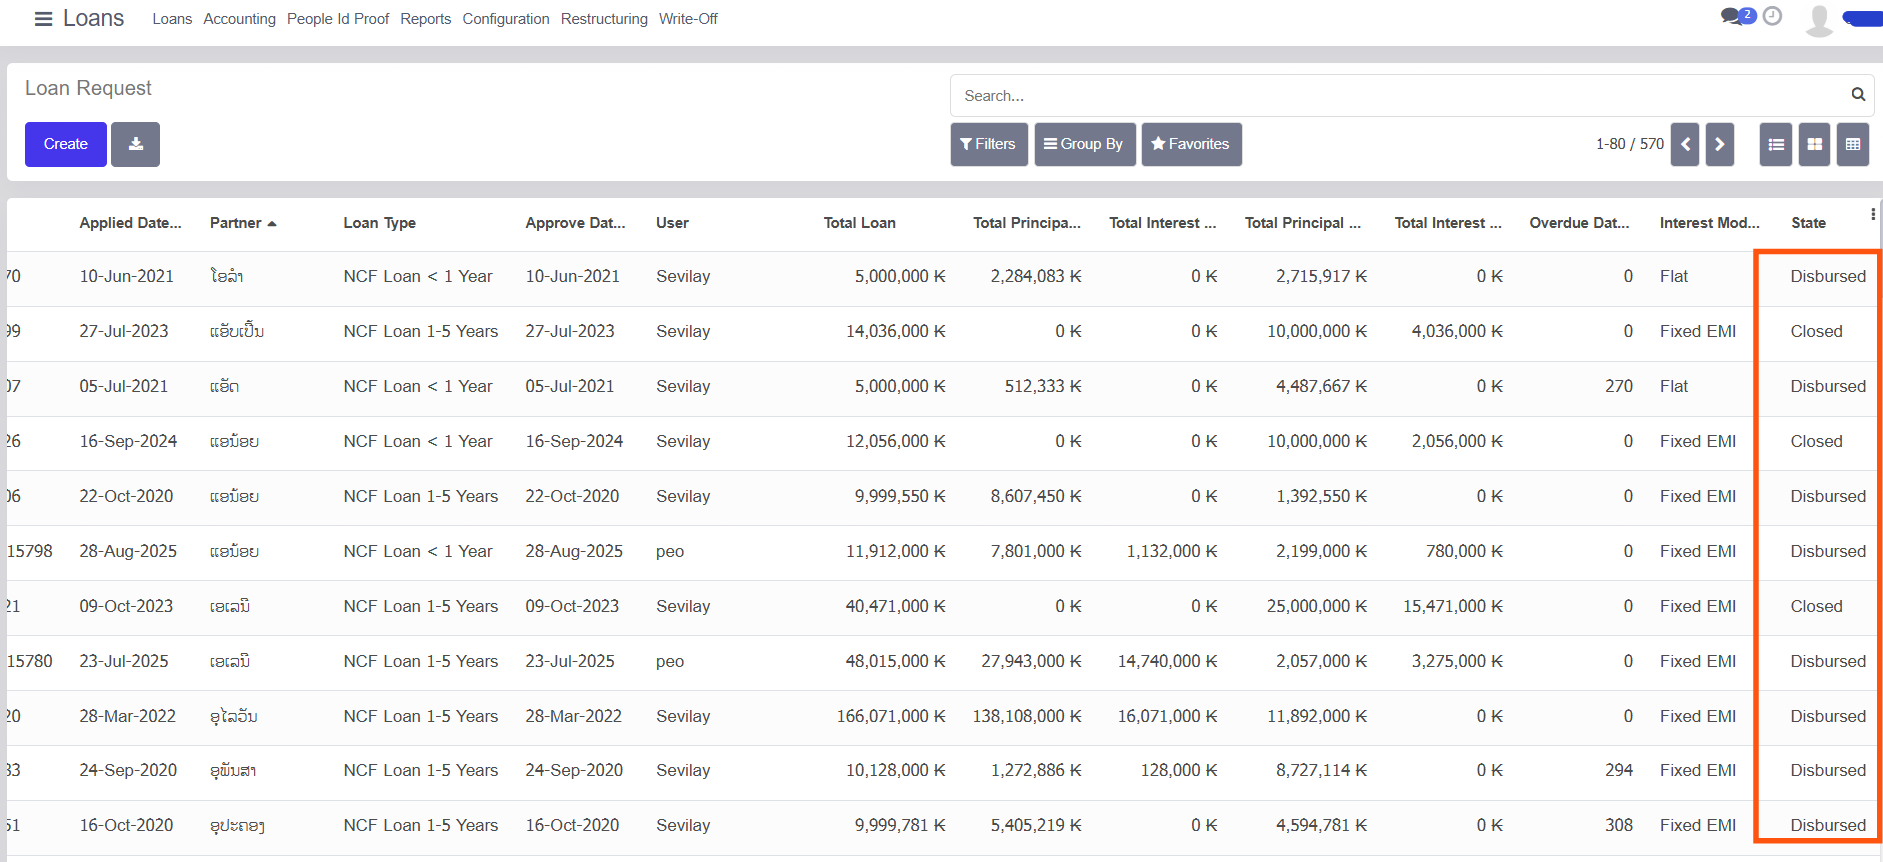
2.2. Understanding the Loan Request List View
On the Loan Request page, the administrator can view all loans with complete details. Each row represents one loan request.
Common columns available:
- Applied Date – Date when the loan was requested
- Loan Number - Customer Loan Number
- Partner – Customer / borrower name
- Loan Type – Type and tenure of the loan
- Approved Date – Date when the loan was approved
- User – Responsible user
- Total Loan – Total loan amount
- Total Principal – Principal amount
- Total Interest – Interest amount
- Overdue Days – Number of overdue days (if any)
- Interest Mode – Flat / Fixed EMI
- State – Current loan status
2.3. Loan State / Status Explanation
The State column clearly shows the current status of each loan:
- Pending –
- This status appears for newly created loans.
- The loan is waiting for review or approval.
- Approved –
- The loan has been reviewed and approved by the administrator.
- Disbursed –
- The loan amount has been successfully disbursed to the customer.
- Closed –
- The loan has been fully repaid and closed.
The administrator can quickly identify the loan progress by checking this column.
2.4. Viewing and Verifying Loan Details
- Click on any loan record from the list.
- The Loan Form View opens.
- From this screen, the administrator can:
- Verify applicant details
- Check loan amount, interest, and tenure
- Review repayment and overdue information
- Confirm the current loan state
This ensures that all loan-related information can be checked clearly from a single screen.
2.5. Loan Form View – Administrator Actions
When an administrator opens a loan record from the Loan Request list, the Loan Form View is displayed. From this screen, the administrator has full control over the loan.
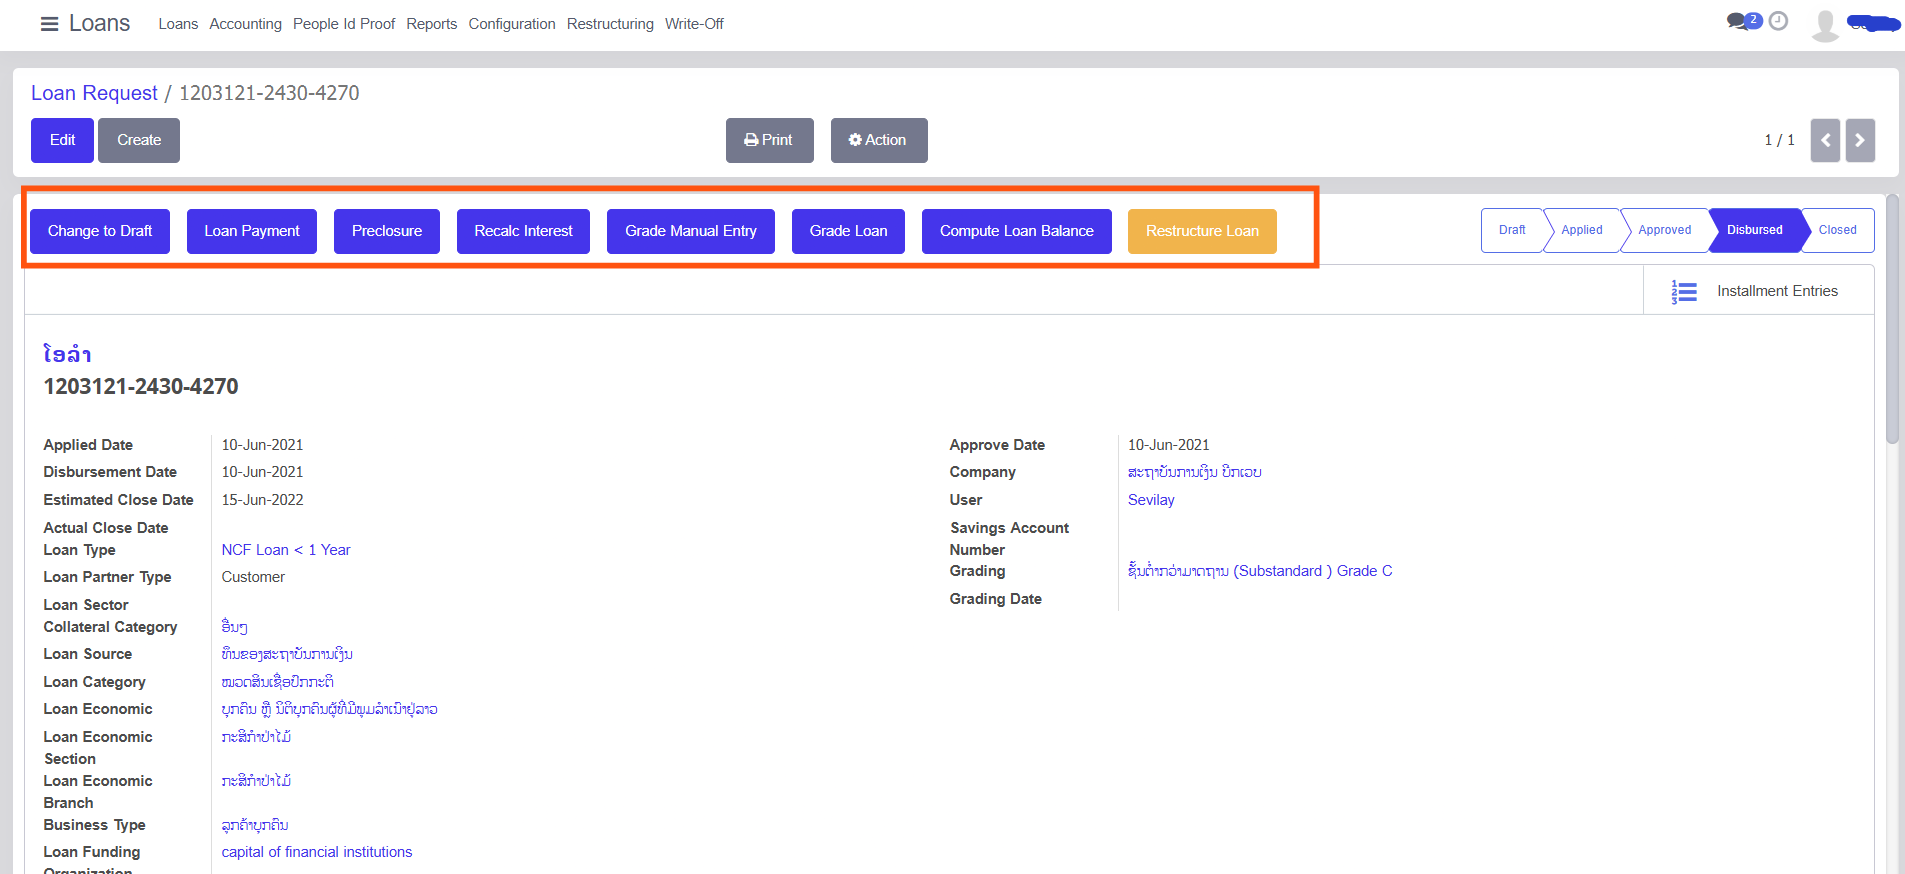
Available Action Buttons
The following buttons are available at the top of the loan form and can be accessed by the administrator:
- Edit –
- Used to modify loan details.
- Administrators can update information such as loan details, proofs, accounting data, and related sections.
- Create –
- Used to create a new loan request directly from the form view.
- Print –
- Allows printing of loan-related reports and documents.
- Action –
- Provides additional loan-related actions depending on the loan state.
2.6. Loan Workflow Buttons
Based on the loan status, the administrator can see and use workflow buttons such as:
- Change to Draft – Move the loan back to draft state
- Loan Payment – Record loan payments
- Preclosure – Close the loan before its scheduled end
- Recalculate Interest – Recompute interest values
- Grade Manual Entry – Enter loan grading manually
- Grade Loan – Assign or update loan grading
- Compute Loan Balance – Recalculate outstanding balances
- Restructure Loan – Modify loan structure when required
These buttons help administrators manage the complete loan lifecycle.
2.7. Loan Status Indicator
On the right side of the loan form, a status bar is displayed showing the loan progress:
- Draft
- Applied
- Approved
- Disbursed
- Closed
This visual indicator helps administrators clearly understand the current stage of the loan.
2.8. Tabs Available in Loan Form
The loan form contains multiple tabs that allow administrators to view and manage detailed information:
- General – Core loan details such as principal amount, interest mode, duration, and rate
- Proofs – Upload and verify customer documents
- Accounting – Accounting entries related to the loan
- Policies – Loan policy-related information
- Notes – Internal notes and comments
- Preclosure – Details related to loan preclosure
- Payments – Payment history and entries
- Installment Accounts – Installment-wise breakup and balances
- Extra Imported Data – Additional imported loan data
- Guarantor – Guarantor details
- Reporting – Loan-related reports
Administrators can switch between these tabs to verify and update all required loan information.
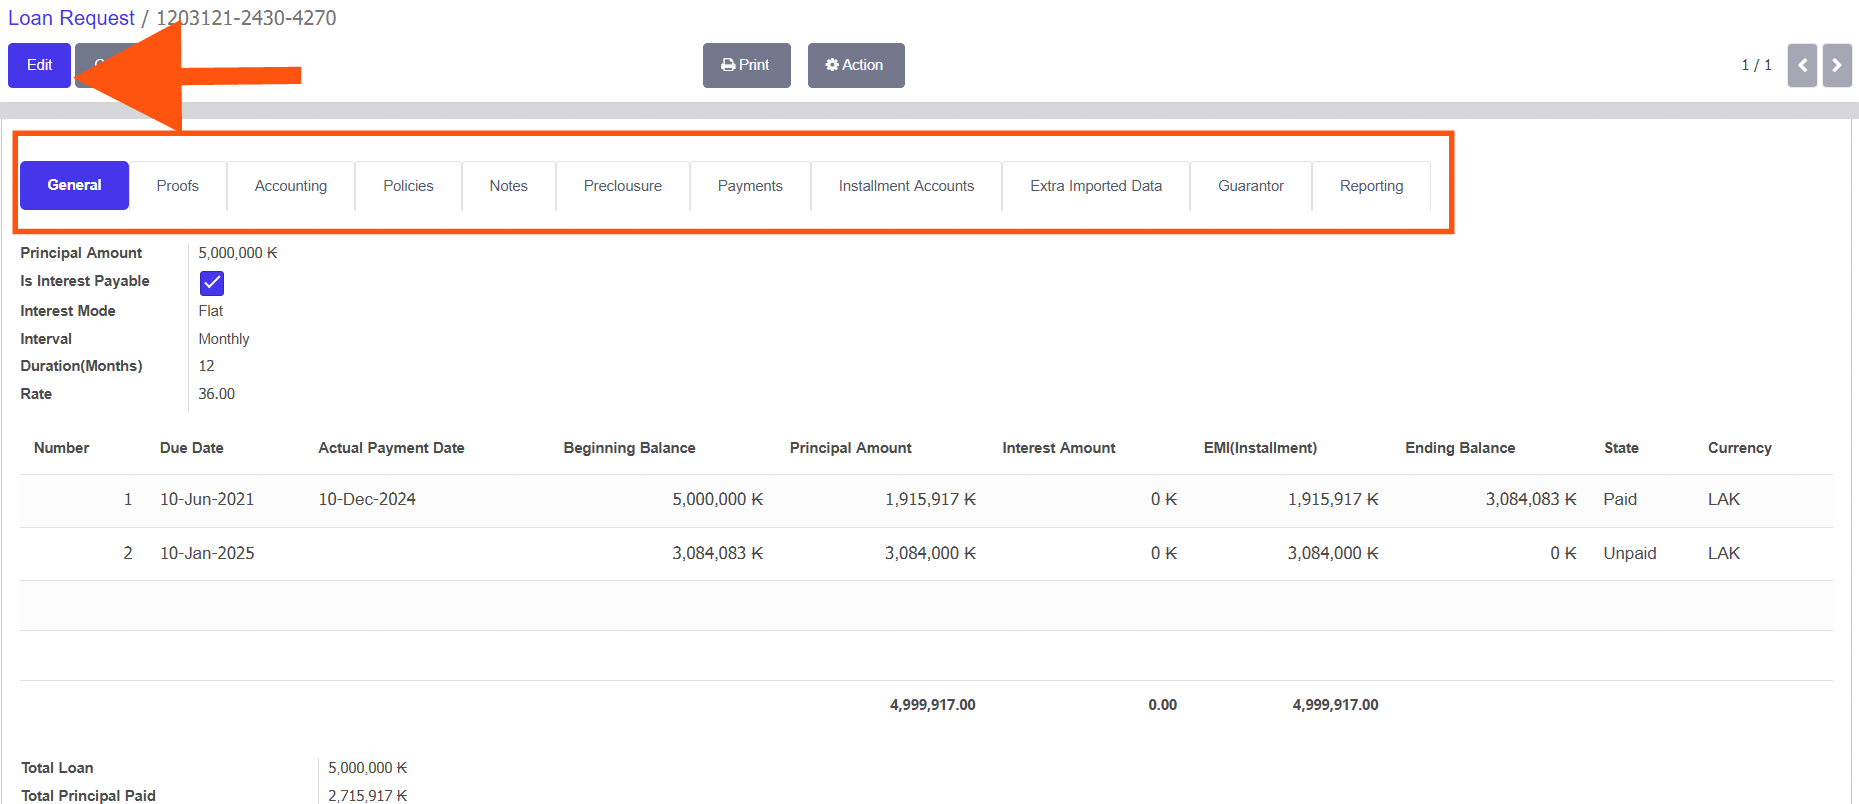
2.9. Installment Details and Payment Status
In the Installment Accounts or payment section, administrators can view:
- Installment number
- Due date
- Actual payment date
- Beginning balance
- Principal amount
- Interest amount
- EMI (Installment amount)
- Ending balance
- Payment state (Paid / Unpaid)
- Currency
This section helps administrators track repayments and outstanding balances accurately.
2.10. Pivot View – Quick Analysis for Administrators
The Pivot View in the Loan Request screen allows administrators to quickly analyze loan data without opening individual records.
Accessing the Pivot View
- Go to Loans → Loan Request.
- Click the Pivot View icon (grid-style icon on the top-right corner).
- The screen switches to a pivot table view showing summarized loan data.
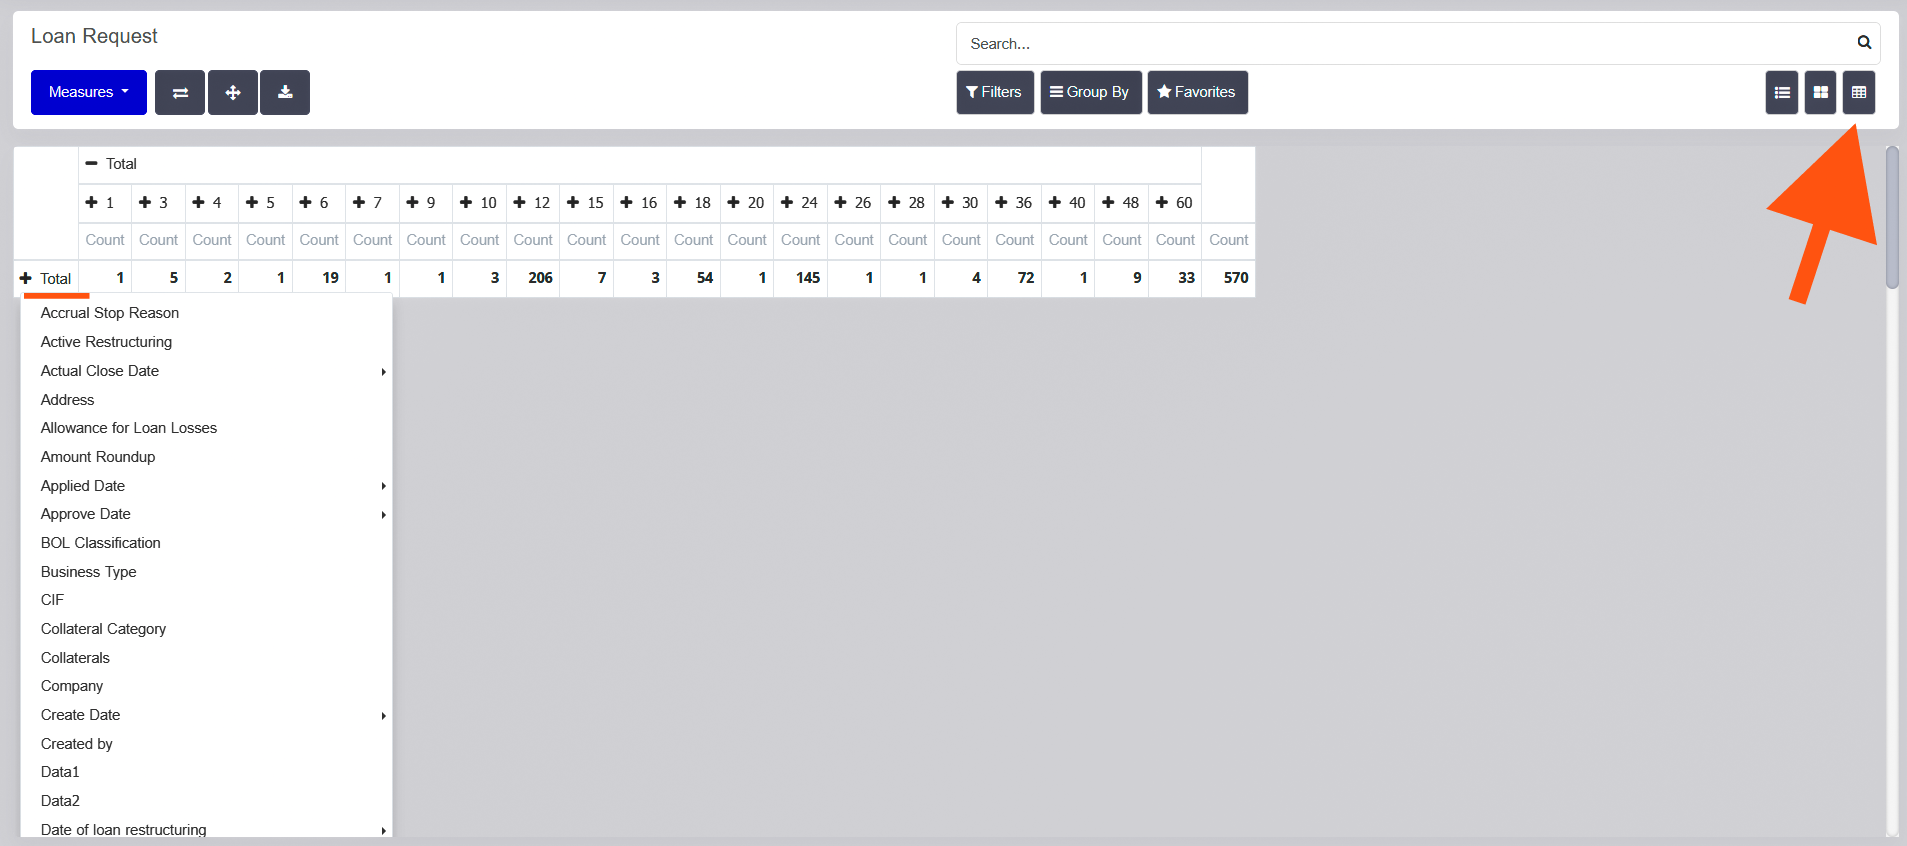
2.11. Adding Required Data in Pivot View
Administrators can add only the required data fields for quick analysis:
- Click the ➕ (Plus) icon on the pivot table.
- Select the required fields such as:
- Loan State
- Applied Date
- Approved Date
- Loan Type
- Company
- Branch
- User
- Collateral Category
- Business Type
- The pivot table updates instantly with the selected data.
This helps administrators focus only on important and relevant information.
Using Measures
- Click Measures to view numerical data such as:
- Loan Count
- Total Loan Amount
- Total Principal
- Total Interest
- Measures allow administrators to compare and analyze loan values efficiently.
Benefits of Pivot View for Administrators
- Quick overview of large loan data
- No need to open individual loan records
- Easy comparison of loan counts and amounts
- Faster decision-making and reporting
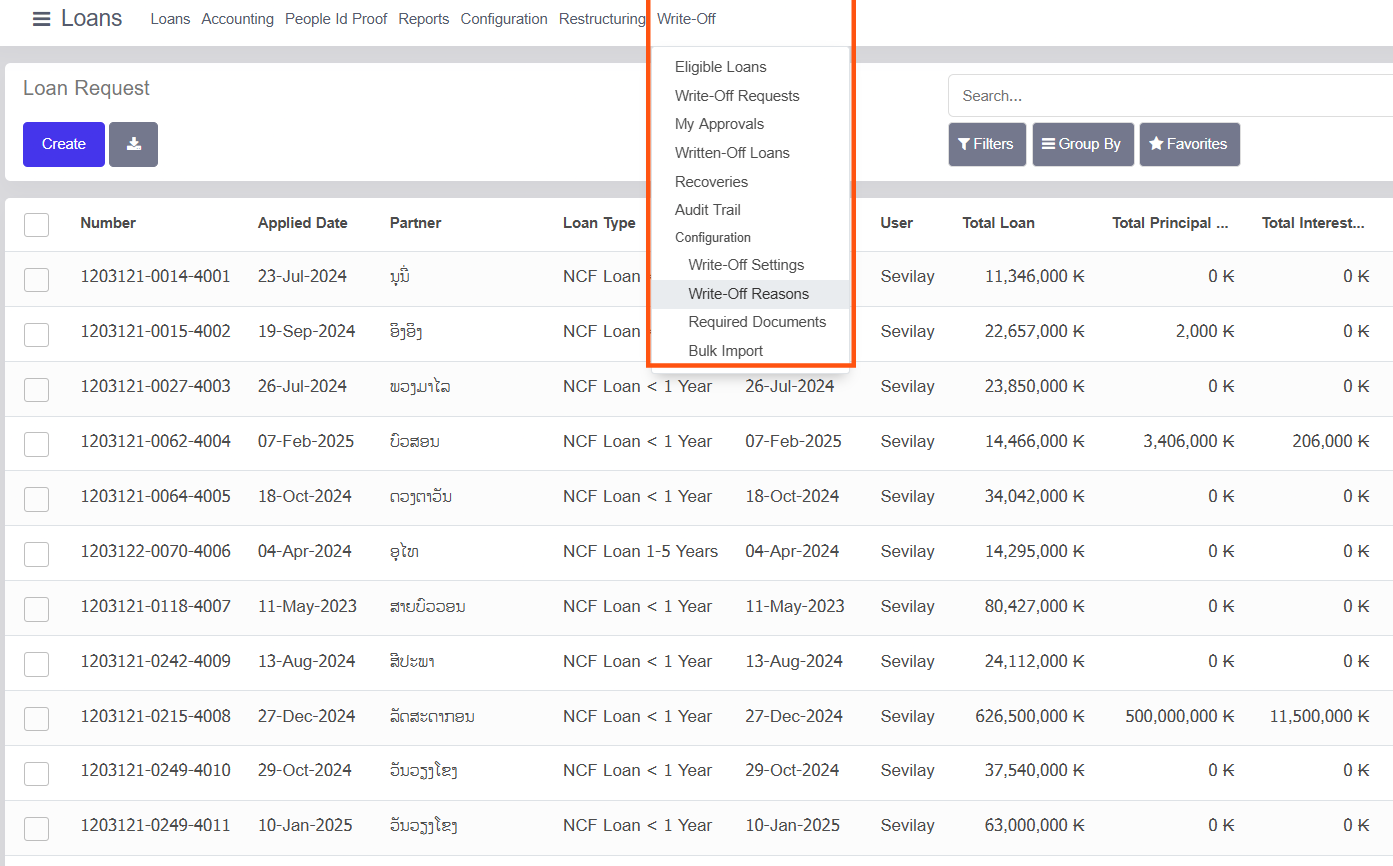
2.12. Write-Off
What is Write-Off?
Write-Off is the process of marking a loan (or part of a loan) as unrecoverable when it is no longer expected to be collected from the borrower. Write-off does not mean the loan is forgiven; it is an accounting action used to reflect realistic financial status.
Purpose of Write-Off
Write-off functionality is used to:
- Manage non-performing or bad loans
- Maintain accurate financial and accounting records
- Track loans that require special recovery actions
- Comply with audit and regulatory requirements
Accessing Write-Off Menu
- Log in as Administrator.
- Go to the top menu Loans.
- Click Write-Off.
The following options are available under Write-Off:
- Eligible Loans – Loans that qualify for write-off based on system rules
- Write-Off Requests – Requests created for loan write-off approval
- My Approvals – Write-off requests awaiting administrator approval
- Written-Off Loans – Loans that have already been written off
- Recoveries – Tracking recoveries made after write-off
- Audit Trail – Complete history of write-off actions
- Configuration – Write-off related configurations
- Write-Off Settings – Define write-off rules and limits
- Write-Off Reasons – Manage reasons for loan write-off
- Required Documents – Define mandatory documents for write-off
- Bulk Import – Import multiple write-off records at once
2.13. Using Filters and Search
To manage large numbers of loans efficiently:
- Use the Search bar to find loans by partner, loan type, or user
- Use Filters to view loans by status (Pending, Disbursed, Closed, etc.)
- Use Group By options to group loans by state, user, or loan type
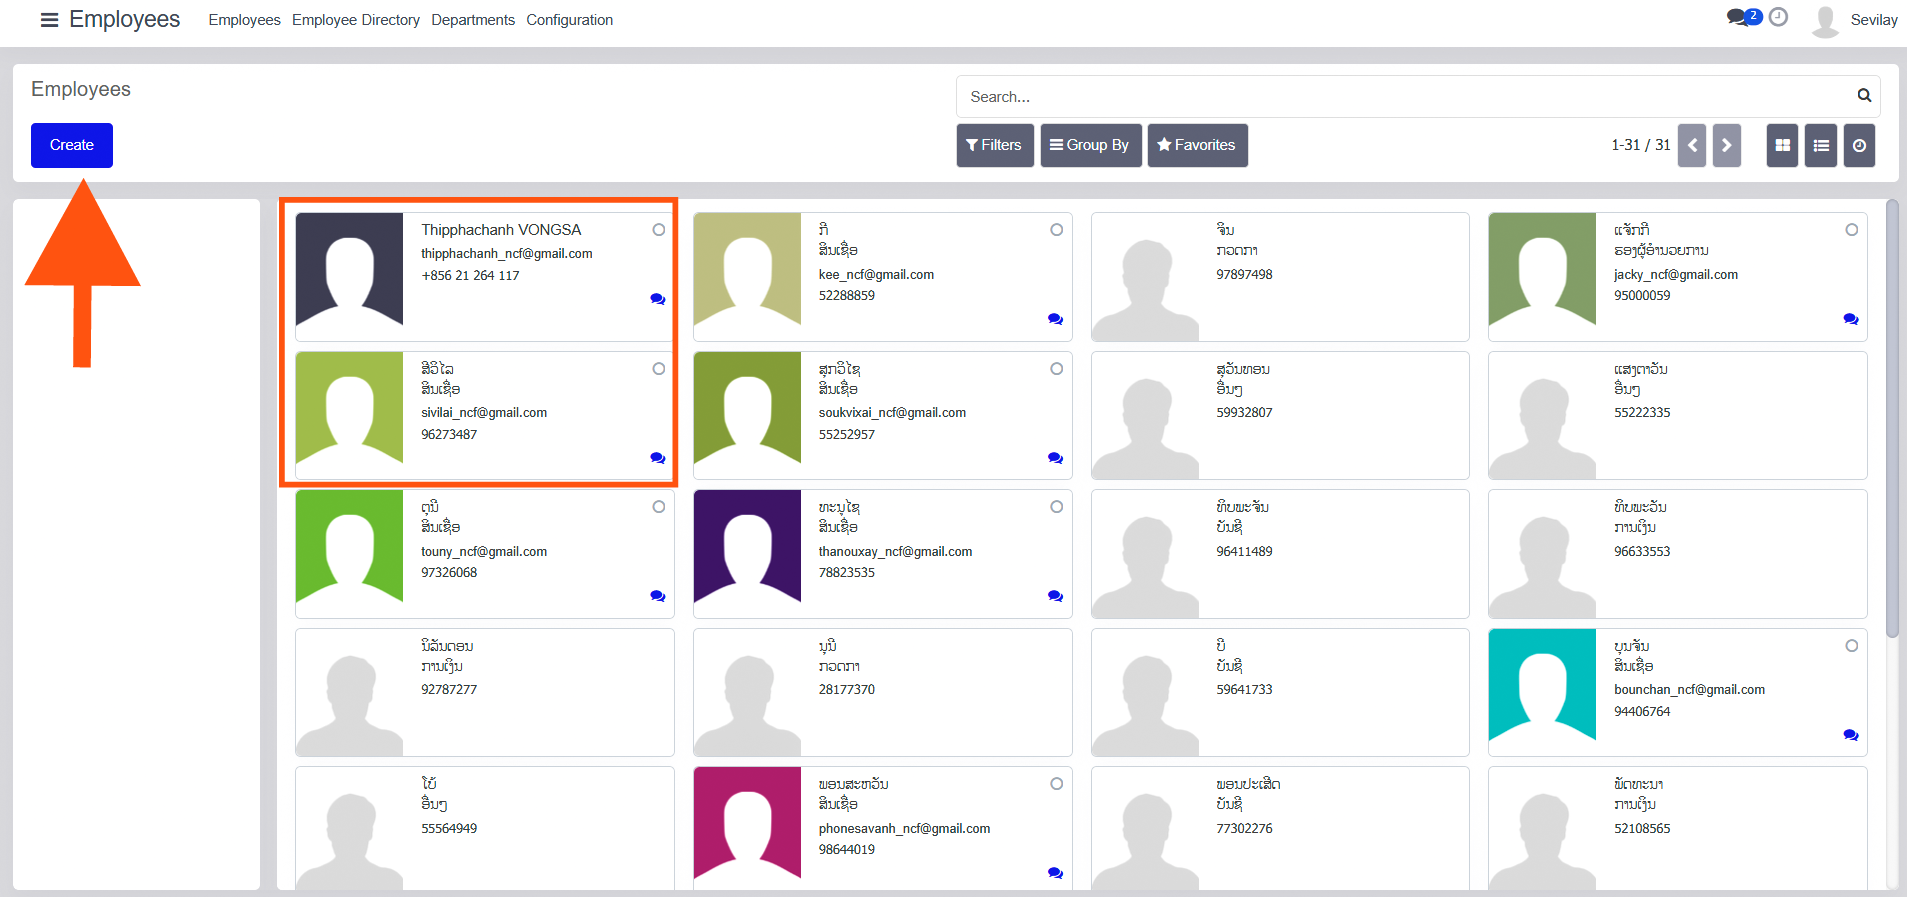
3. Administrator Guide – Employee Management
3.1 Employee List View
- Administrators can access Employees → Employees.
- The list view displays:
- Employee name
- Phone number
- Administrators can:
- Create employees using Create
- Quickly identify employees using visual cards
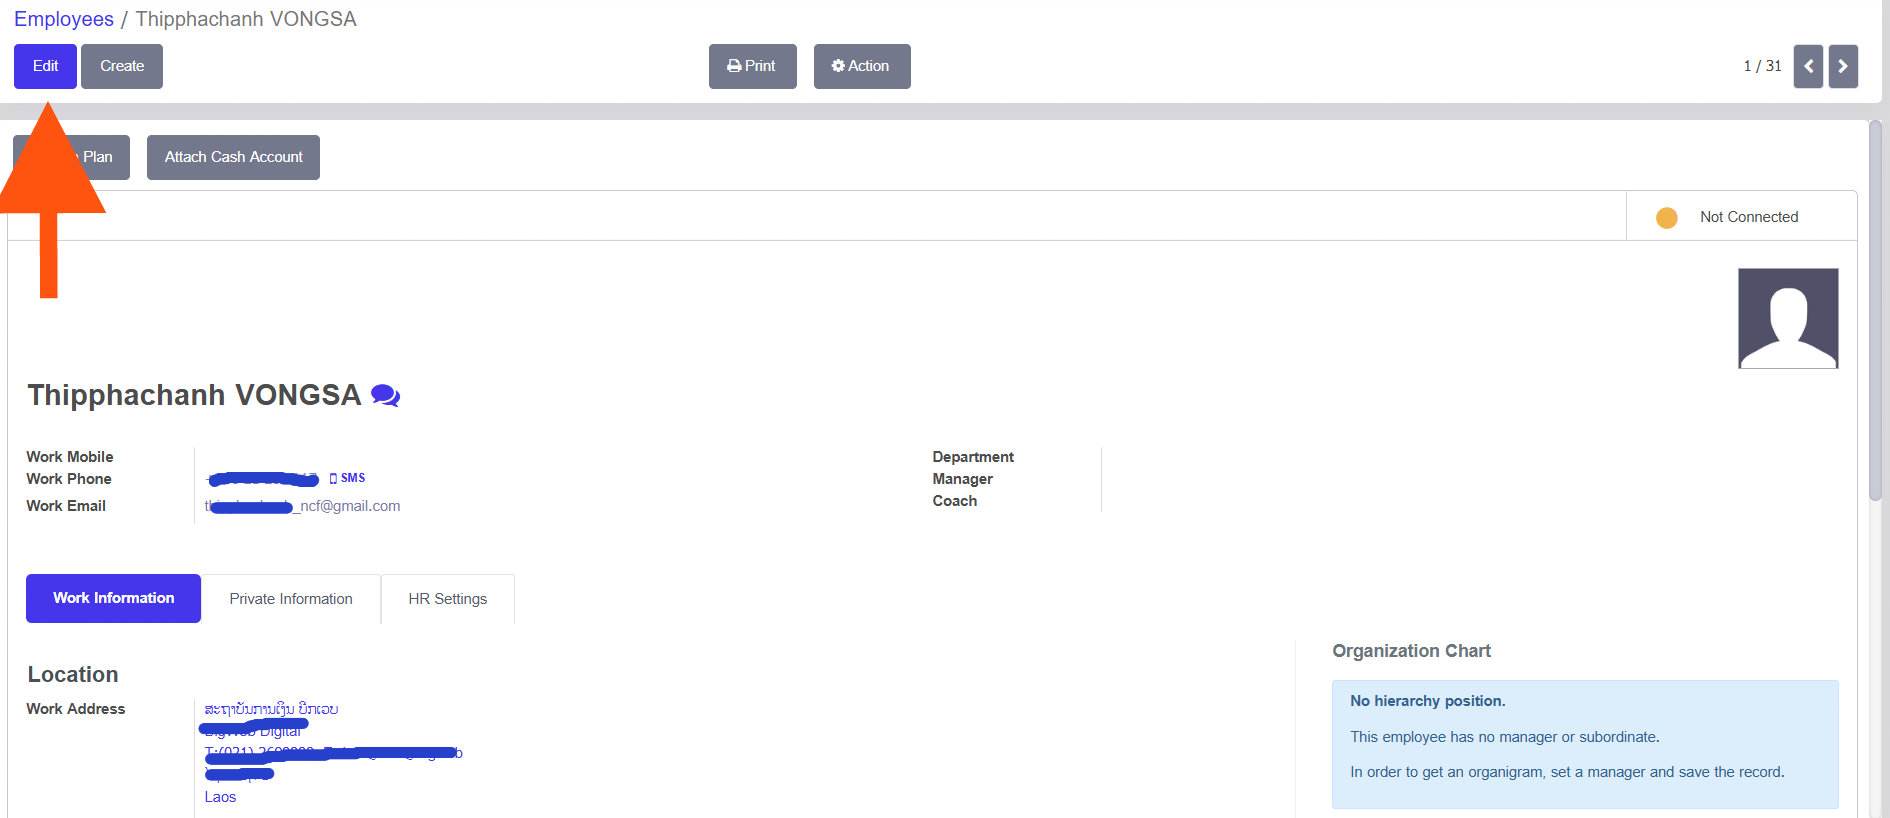
3.2 Employee Form View
- Clicking an employee opens the form view.
- Administrators can:
- Edit employee details using Edit
- Print employee information
- Perform actions from the Action menu
3.3 Employee Information Tabs
- Work Information – Department, manager, coach, work contact details
- Private Information – Personal details
- HR Settings – HR-related configurations
3.4 Additional Employee Actions
- Plan – Assign planning or schedules
- Attach Cash Account – Link financial accounts
- Organization Chart – View reporting structure
Accounting
Accounting Dashboard Documentation
The Accounting Dashboard serves as the central hub for financial overview and quick actions. It provides a visual summary of invoices, bills, and miscellaneous operations, allowing for rapid navigation and data entry.
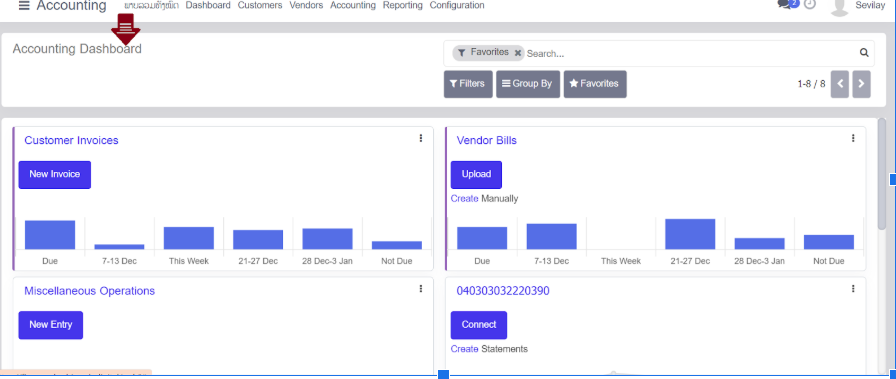
1. Top Navigation Bar
The top menu provides access to the main sub-modules within the Accounting application:
- Dashboard: Returns you to the current overview screen.
- Customers: Manage Invoices, Credit Notes, Payments, and Customer Statements.
- Vendors: Manage Bills, Refund Notes, and Payments to suppliers.
- Accounting: Access Journal Entries, Ledgers, and Asset Management.
- Reporting: Generate Profit & Loss, Balance Sheets, and Executive Summaries.
- Configuration: Setup Bank Accounts, Fiscal Positions, and Tax Settings.
3. Dashboard Cards (Journals)
Each card represents a specific financial journal. The interface displays key metrics and action buttons for each.
A. Customer Invoices
Provides an overview of receivables.
- Action Button: Click [New Invoice] to quickly draft a new customer bill.
- Visual Chart: A bar graph showing amounts "Due" versus future due dates (e.g., 7-13 Dec, 21-27 Dec).
- Status Indicator: Highlights amounts that are "Not Due" yet.
B. Vendor Bills
Provides an overview of payables.
- Action Button: Click [Upload] to import digital bills (PDF/Images) or [Create Manually].
- Visual Chart: Tracks upcoming payment deadlines to help manage cash flow.
Located at the top right, this section allows you to narrow down the journals displayed on the dashboard.
- Search Bar: Search for specific journals or accounts.
- Filters: Filter by specific criteria (e.g., Favorites, Unpaid, Active).
- Group By: Organize the view by categories such as "Journal Type."
- Favorites: Save custom search views for quick access.
C. Miscellaneous Operations
Used for manual journal entries that do not fall under standard sales or purchases (e.g., depreciation, adjustments).
- Action Button: Click [New Entry] to record a manual transaction.
D. Bank / Cash Accounts (e.g., "040303032220390")
Represents connected bank accounts or cash boxes.
- Action Button: Click [Connect] to sync with your bank or [Create Statements] to enter transactions manually.
4. User Interface Shortcuts
- Menu Icon (≡): Located at the top left to switch between different ERP modules (Sales, CRM, Inventory, etc.).
- Vertical Ellipsis (⋮): Located at the top right of each card; provides a dropdown menu for "View," "New," and "Settings" specific to that journal.
- Pagination (< >): Use the arrows at the top right to scroll through different pages of journals if you have more than 8 active accounts.
5. Typical Workflow: Entering a Bill
- Navigate to the Vendor Bills card.
- Click the Upload button to use OCR (Optical Character Recognition) for automatic data entry.
- Review the drafted bill and click Confirm.
- Once the bill is paid, register the payment via the Accounting tab or directly on the bill.
Note: The language toggle next to "Dashboard" allows users to switch between English and the local language (Lao).
Accounting Module Overview
This document outlines the administrative structure and key performance indicators available within the Accounting management system.
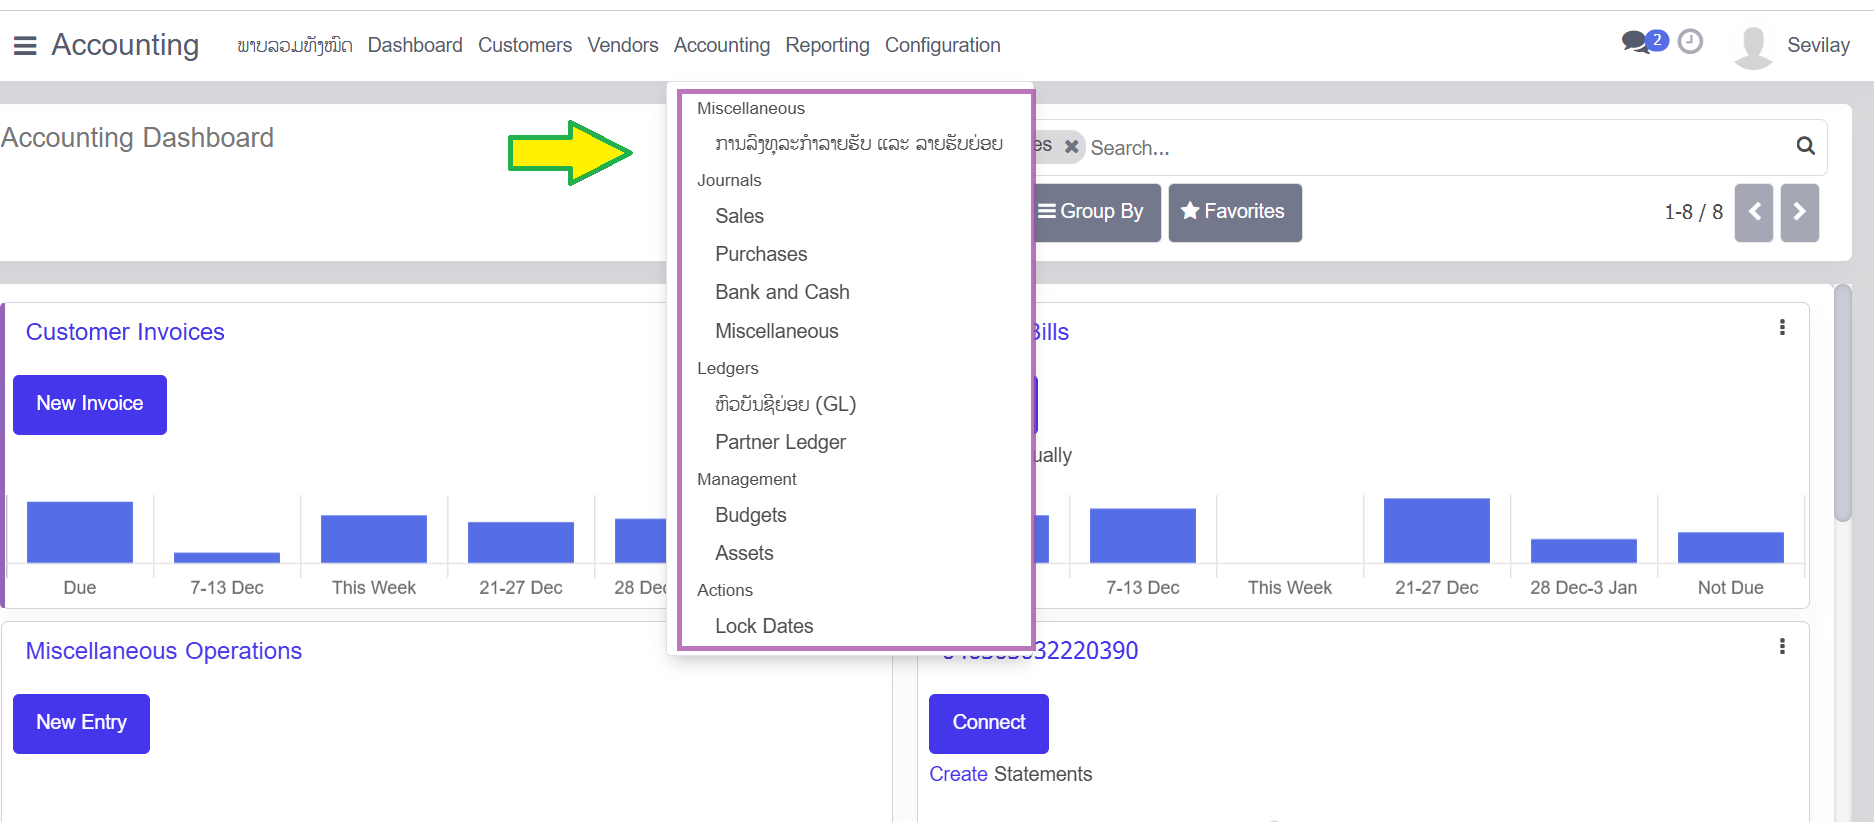
1. Accounting Operations Menu
The Accounting dropdown menu provides access to core financial management tools and advanced controls.
Journals
Categorized logs for recording financial transactions:
- Sales: Records all customer-related revenue.
- Purchases: Logs all vendor-related expenses.
- Bank and Cash: Tracks liquid asset movements.
- Miscellaneous: Used for manual adjustments and non-standard entries.
Ledgers & Management
Administrative reporting and planning tools:
- General Ledger (GL): The master record of all company accounts.
- Partner Ledger: Tracks balances specific to individual customers or vendors.
- Management Tools: Includes Budgets for financial planning and Assets for tracking fixed-asset depreciation.
Administrative Actions
- Lock Dates: A critical control used to prevent any further modifications to entries for a specific period after closing.
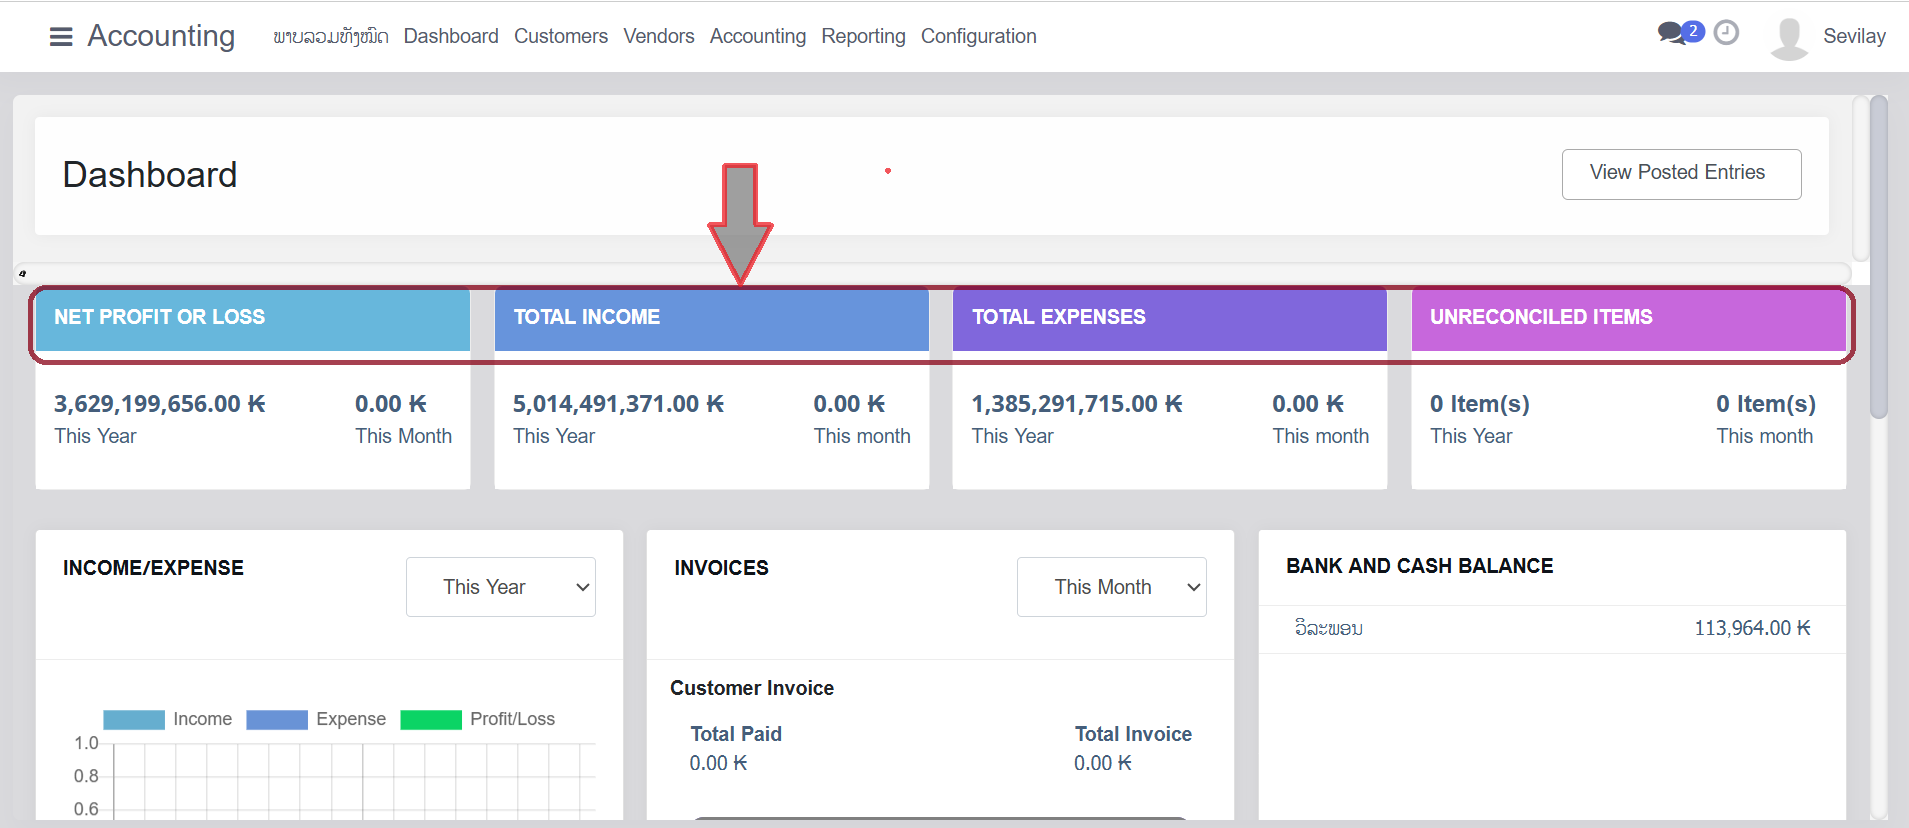
2. Financial Dashboard KPIs
The main dashboard provides a real-time summary of the company's financial health, measured in Kip (₭).
Metric
Current Value (This Year)
Net Profit or Loss 3,629,199,656.00 ₭
Total Income 5,014,491,371.00 ₭
Total Expenses 1,385,291,715.00 ₭
Unreconciled Items 0 Item(s)
Accounting Administration Documentation: Accounting Menu Operations
This document provides a detailed overview of the administrative functions available under the Accounting dropdown menu within the ERP system. This menu is designed for managing journals, ledgers, and advanced financial management tasks.
1. Journals Management
The Journals section allows administrators to view and record transactions categorized by their financial nature.
- Sales: View and manage all journal entries related to customer invoices and revenue.
- Purchases: Review journal entries stemming from vendor bills and expenses.
- Bank and Cash: Manage transactions related to liquid assets, bank statements, and petty cash.
- Miscellaneous: Access the journal for non-standard entries, such as end-of-year
- adjustments or depreciation.
2. Ledgers
Ledgers provide a structured view of the company's financial health and partner relationships.
- General Ledger (GL): The master record of all financial transactions, organized by account.
- Partner Ledger: A specialized view showing transactions and balances specific to customers and vendors.
3. Financial Management
These tools assist in high-level financial planning and asset tracking.
- Budgets: Create and monitor financial targets to compare planned vs. actual spending.
- Assets: Manage the lifecycle of fixed assets, including depreciation schedules.
4. Administrative Actions
Critical administrative controls for maintaining data integrity.
- Lock Dates: Use this feature to prevent further entries or modifications to a specific period (e.g., after a monthly or annual close) to ensure financial reports remain static.
Dashboard Quick Reference
While the Accounting menu handles detailed recording, the main Accounting Dashboard provides rapid entry points for daily tasks:
Feature Primary Action
Customer Invoices New Invoice: Create a bill for a customer.
Vendor Bills Upload: Process supplier invoices via document upload.
Bank Connection Connect: Sync electronic statements for reconciliation.
Miscellaneous Ops New Entry: Quickly record a manual journal entry.
Reporting
This documentation provides an overview of the financial dashboard, operational journals, and regulatory reporting capabilities within the accounting module.
1. Executive Financial Dashboard
The primary dashboard offers a real-time summary of organizational financial health in Kip (₭).
Key Performance Indicators (KPIs)
Metric Fiscal Year To Date Current Month
Net Profit or Loss 3,629,199,656.00 ₭ 0.00 ₭
Total Income 5,014,491,371.00 ₭ 0.00 ₭
Total Expenses 1,385,291,715.00 ₭ 0.00 ₭
Unreconciled
Items 0 Item(s) 0 Item(s)
Visual Analytics
- Income/Expense Chart: Provides a comparative view of Income, Expense, and Profit/Loss over the selected fiscal period.
- Invoices Summary: Tracks "Total Paid" versus "Total Invoice" for the current month.
- Bank and Cash Balances: Displays liquid asset status for specific accounts (e.g., วิละພອນ: 113,964.00 ₭).
2. Accounting Operations Menu
The Accounting dropdown menu contains core administrative tools for ledger management and transactional control.
- Journals: Access categorized logs for Sales, Purchases, Bank and Cash, and Miscellaneous entries.
- Ledgers: Includes the General Ledger (GL) and Partner Ledger for detailed financial tracking.
- Management: Tools for overseeing organization Budgets and fixed Assets.
- Actions: Contains the Lock Dates feature to prevent unauthorized changes to closed fiscal periods.
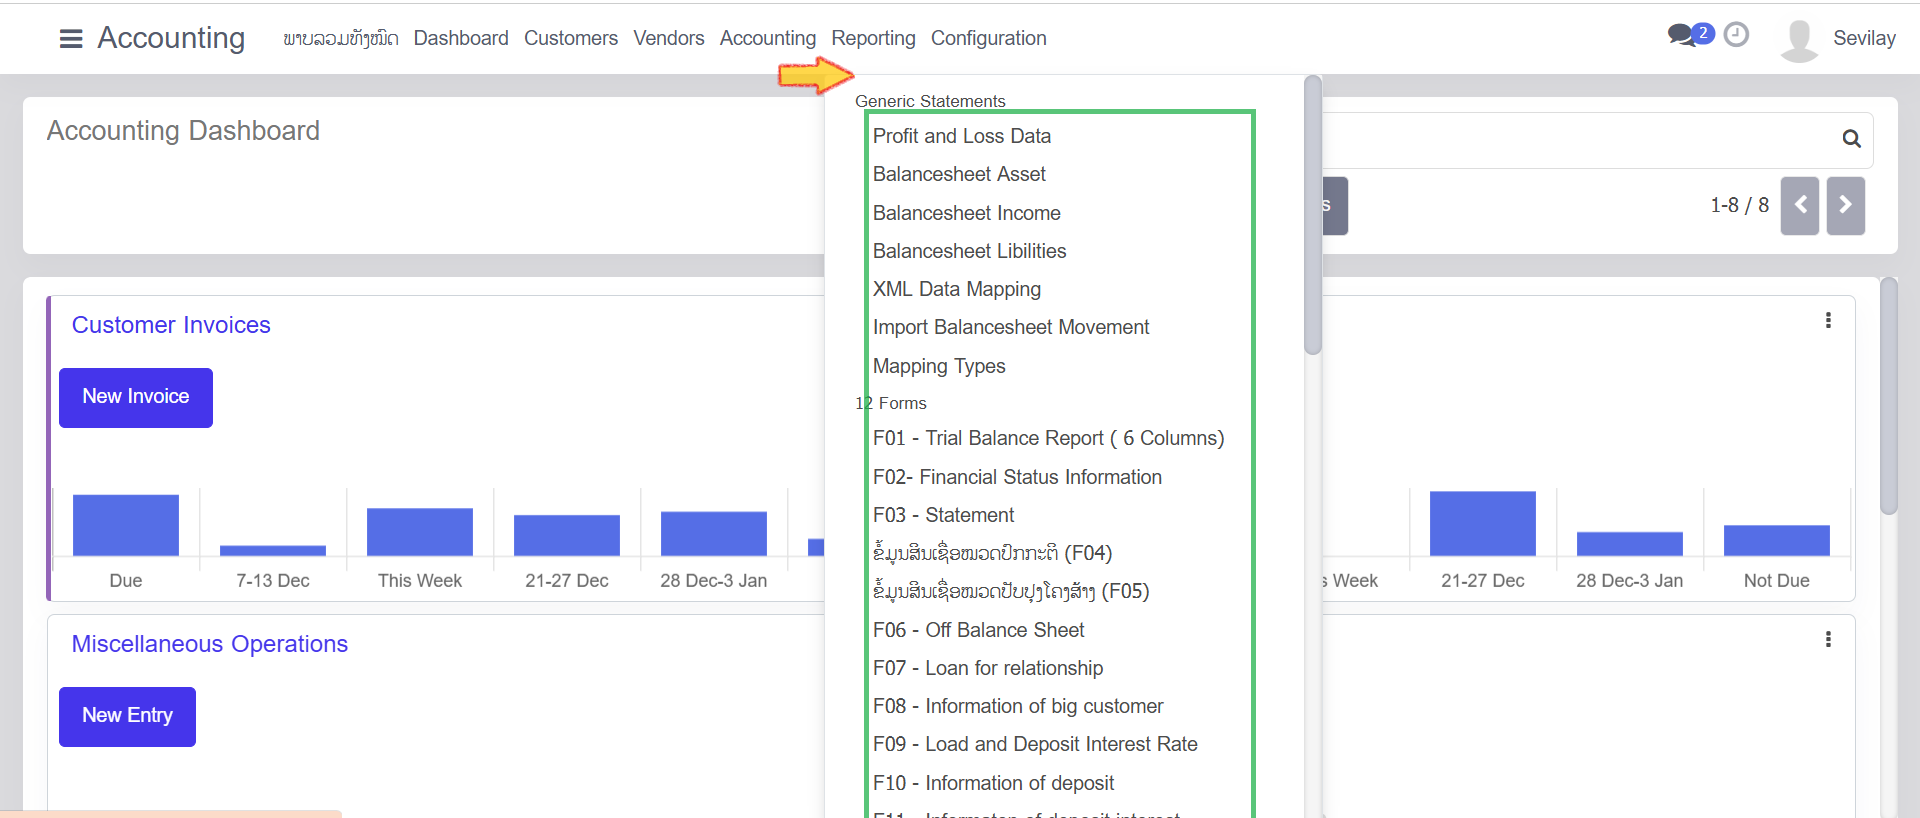
3. Reporting and Compliance
The Reporting menu facilitates the generation of both standard financial statements and specialized regulatory forms.
Generic Statements
- Profit and Loss Data: Summarizes revenues and expenses.
- Balance Sheet Data: Detailed reports for Assets, Income, and Liabilities.
- Data Tools: Includes XML Data Mapping and Import Balancesheet Movement for external data integration.
Regulatory Compliance (12 Forms)
The system supports standardized reporting templates, including:
- F01: Trial Balance Report (6 Columns).
- F02: Financial Status Information.
- F03: Financial Statement.
- F06: Off-Balance Sheet items.
- F08 – F10: Specialized reports for Big Customers, Interest Rates, and Deposits.
4. Operational Shortcuts
The Accounting Dashboard provides direct access to high-frequency tasks:
- Customer Invoices: Create a New Invoice.
- Vendor Bills: Upload documents or create bills manually.
- Bank Accounts: Connect to banking services or manually create statements.
- Miscellaneous Operations: Record a New Entry for non-standard transactions.
F01-Trial Balance
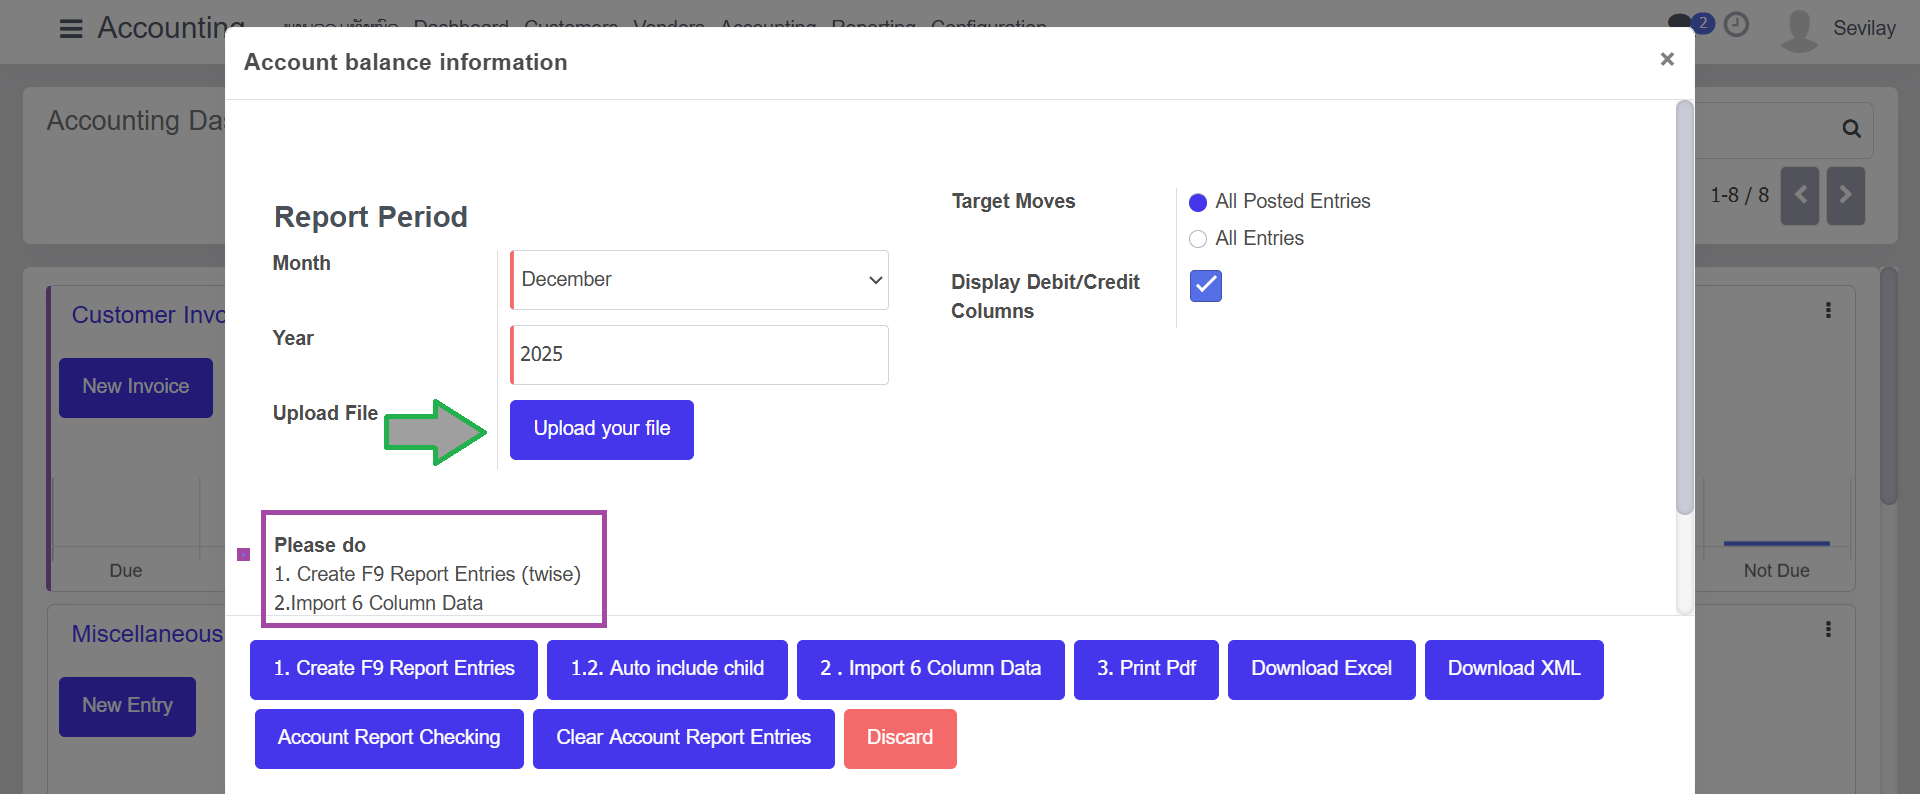
1. Interface Overview
The Account Balance Information pop-up allows administrators to define the scope of a financial report and perform data-processing actions.
A. Report Period Configuration
- Month: Select the specific month for the report (current selection: December).
- Year: Specify the fiscal year (current selection: 2025).
- Upload File: Use the "Upload your file" button to provide source documents for processing.
B. Report Parameters
- Target Moves: * All Posted Entries: Includes only finalized/validated accounting entries.
- All Entries: Includes drafts and unposted entries.
- Display Debit/Credit Columns: When checked, the system will split financial movements into separate debit and credit columns.
2. Standard Operating Procedures (SOP)
Phase 1: Generating Report Entries
- Verify that the Month and Year are correct.
- Select the desired Target Moves filter.
- Click 1. Create F9 Report Entries.
- Note: If hierarchical data is required, click 1.2. Auto includes a child.
- According to the "Please do" instructions in the UI, this step should be performed twice to ensure data consistency.
Phase 2: Data Import
- Click the Upload your file button to select your source file.
- Click 2. Import 6 Column Data to map and ingest the data into the current report period.
Phase 3: Validation & Export
- Click Account Report Checking to run a system audit for discrepancies or unbalanced entries.
- Once validated, choose an output format:
- 3. Print Pdf: For formal documentation.
- Download Excel: For manual analysis.
- Download XML: For system-to-system data transfers.
3. Maintenance Actions
- Clear Account Report Entries: Use this button to wipe the current working data and start a new report session.
- Discard: Close the window without saving changes or processing further data.
Warning: Clearing report entries is a permanent action. Ensure all necessary files have been downloaded before clearing.
F02-Financial status information
This module allows users to configure and export detailed financial reports based on specific timeframes and accounting criteria. It provides a flexible way to review the company's financial health via printed reports or data exports.
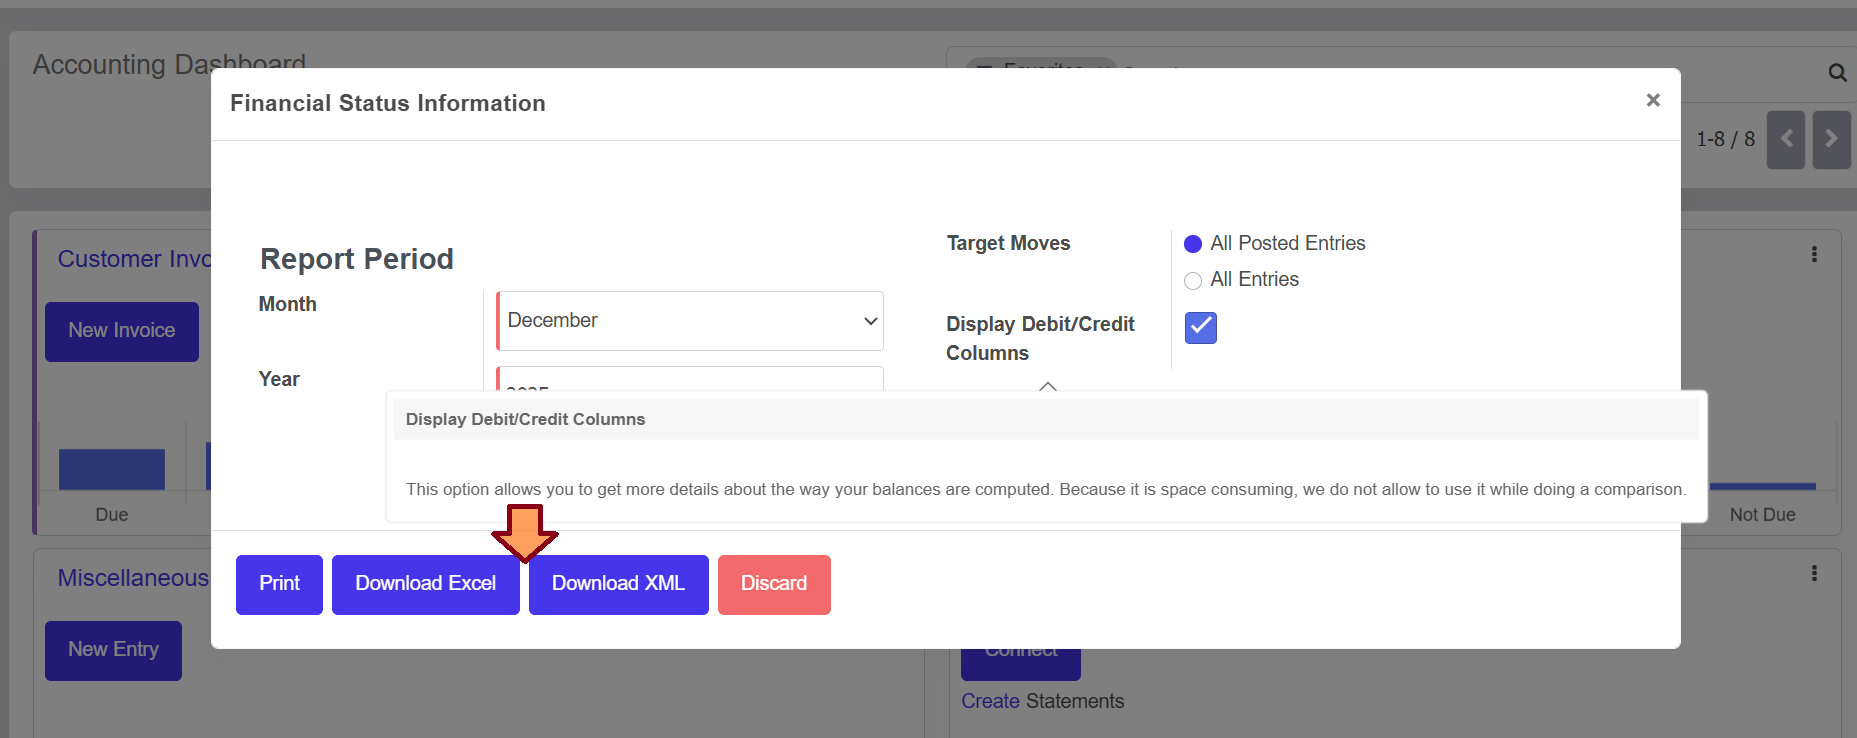
1. Report Period Configuration
The user must define the specific timeframe for the data they wish to analyze.
- Month: A dropdown selection to choose the specific month of the financial year (e.g., December).
- Year: A numeric input or selection to define the fiscal year (e.g., 2025).
2. Target Moves
This section filters which accounting entries are included in the final report:
- All Posted Entries: Only includes finalized, validated journal entries.
- All Entries: Includes both posted entries and draft/unposted entries for a more comprehensive (though preliminary) view.
3. Display Options
- Display Debit/Credit Columns: A checkbox that, when enabled, adds granular detail showing separate columns for debits and credits.
- Note: This provides more detail on how balances are computed. However, this option is disabled when performing report comparisons to save space and maintain readability.
4. Available Actions
The footer of the modal provides several ways to process the requested data:
Action Description
Print Generates a standard PDF or printer-friendly version of the financial status.
Download Excel Exports the data into an .xlsx format, ideal for manual calculation and manipulation.
Download XML Exports the data in a structured .xml format for integration with other systems.
Discard Closes the window without generating a report or saving changes.
F03-Statement
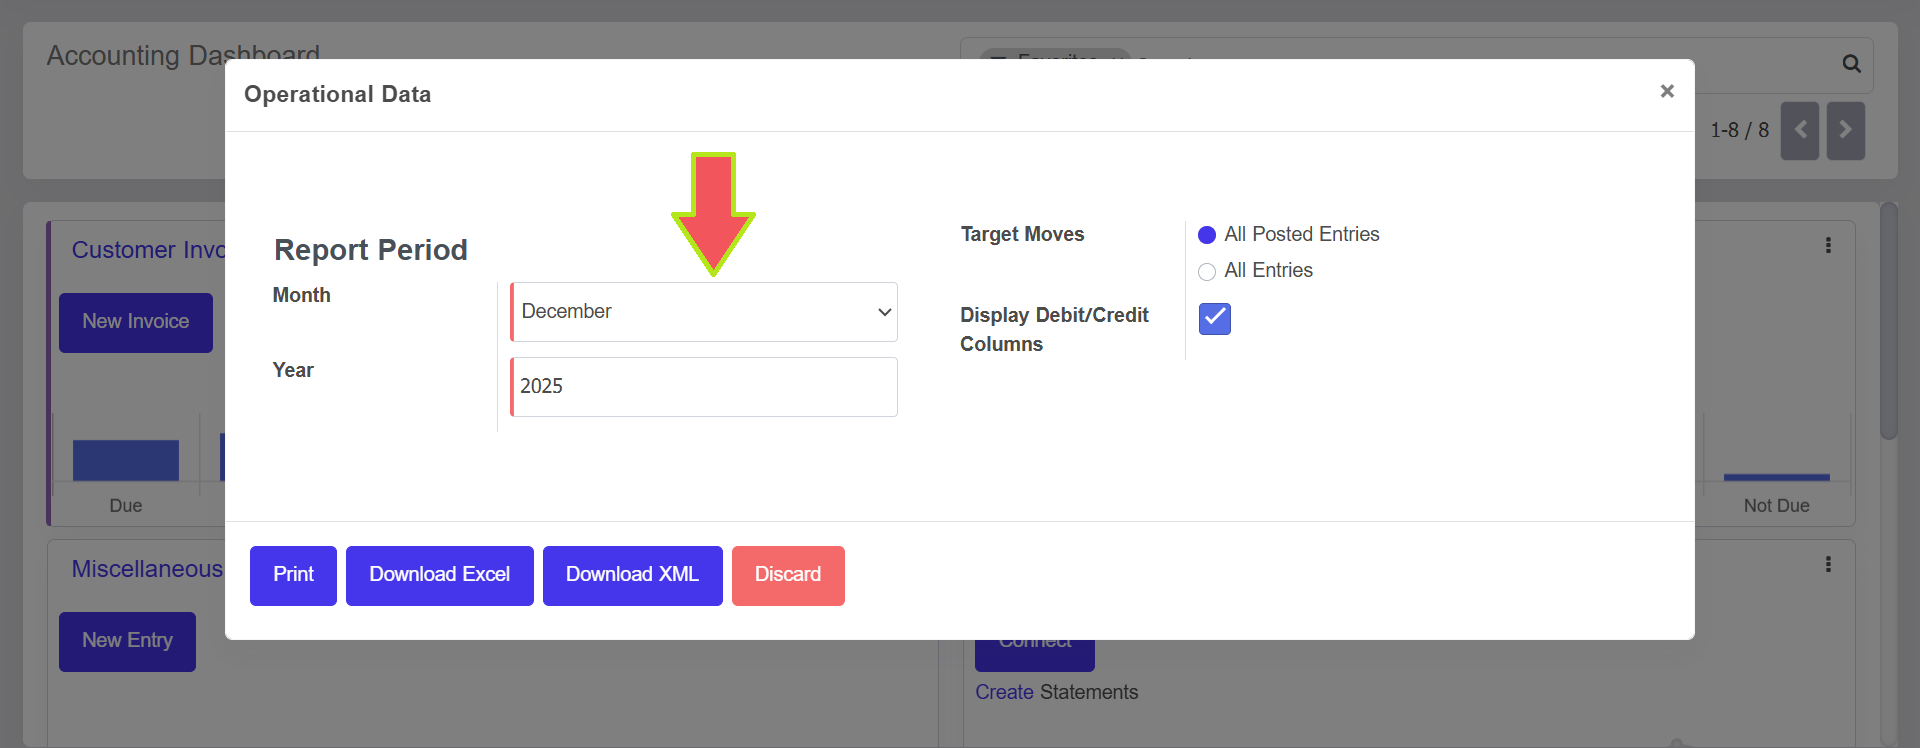
Operational Data Documentation
The Operational Data modal provides a specialized interface for configuring and exporting operational reports based on defined timeframes and entry types.
1. Header Information
- Title: Operational Data.
- Close Action: A close icon (x) is located in the top-right corner to exit the modal.
2. Report Configuration Parameters
The user must specify the following criteria to filter the operational data:
A. Report Period
- Month: A dropdown menu used to select the specific month for the report, such as "December".
- Year: A text input field to specify the fiscal year, such as "2025".
B. Target Moves
Users can choose which types of accounting moves to include:
- All Posted Entries: Includes only journal entries that have been finalized and posted.
- All Entries: Includes all journal entries, regardless of whether they are in draft or posted status.
C. Display Preferences
- Display Debit/Credit Columns: A checkbox that allows the user to include or exclude specific columns for debit and credit amounts in the generated report.
3. Action Buttons
The footer contains primary actions for processing the data request:
Button Function
Print Sends the configured report directly to a printer or generates a printable PDF.
Download Excel Exports the operational data into an Excel spreadsheet format for further analysis.
Download XML Exports the data in XML format for system integration or data portability.
Discard Cancels the current configuration and closes the modal without saving or exporting.
F04-Standard credit information
The Standard Credit Information modal is a configuration tool within the accounting dashboard designed to filter and export credit-related data for specific reporting periods.
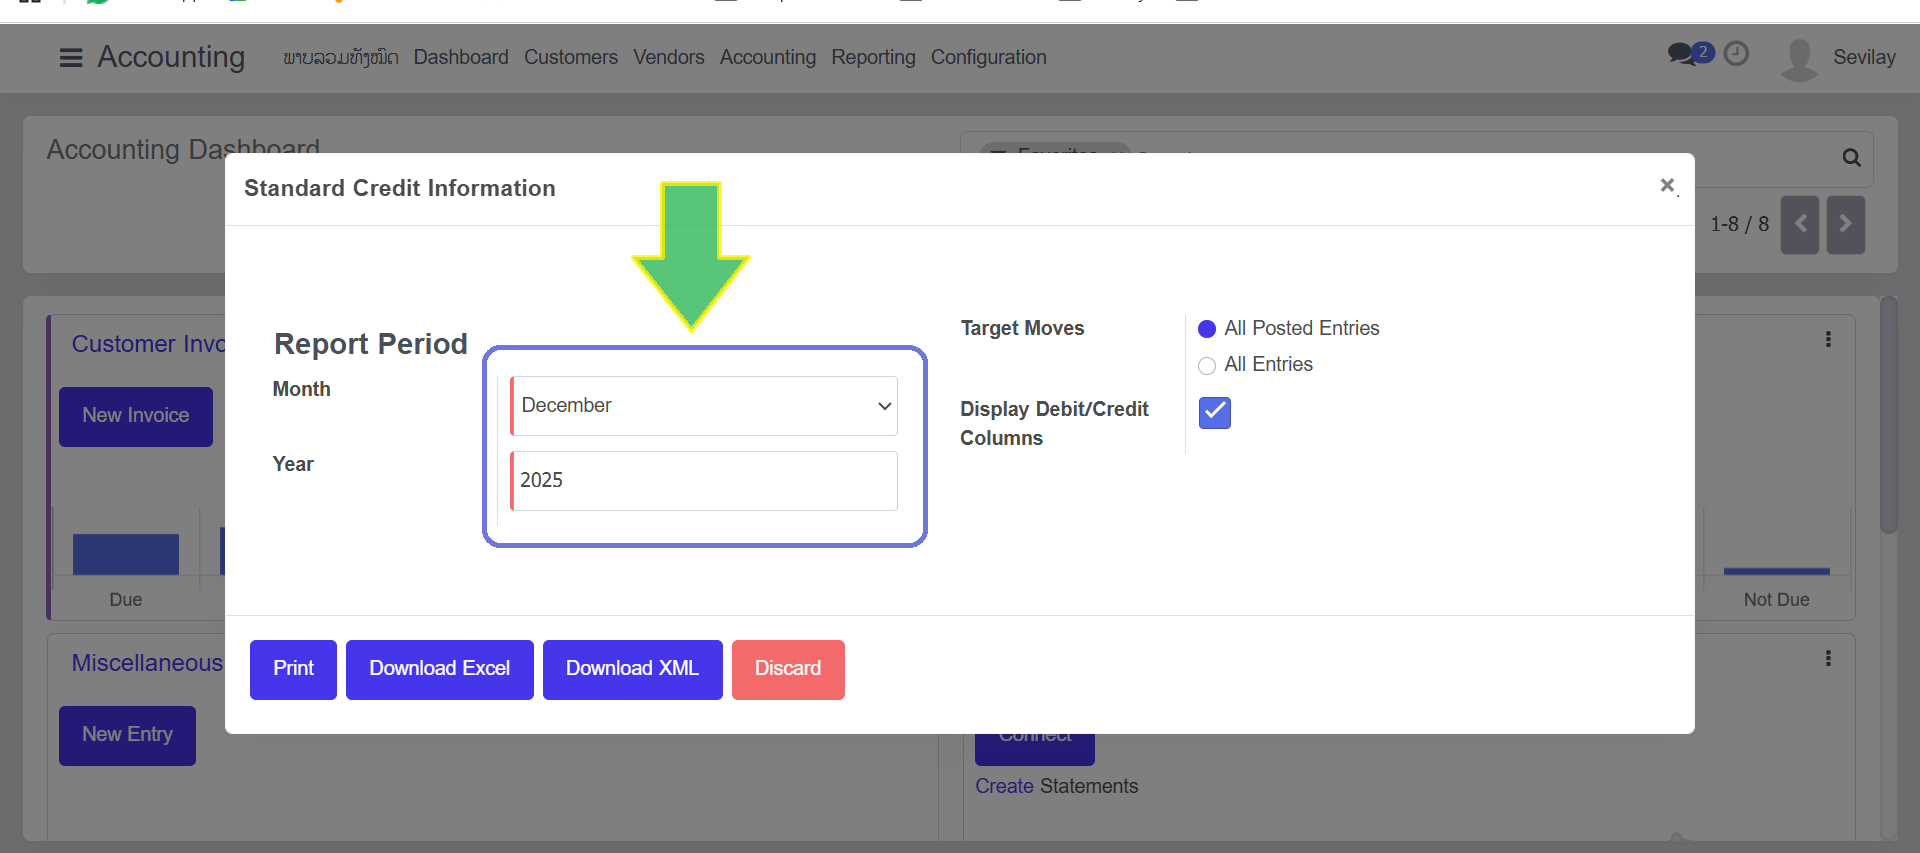
1. Header Information
- Title: Standard Credit Information.
- Close Action: Users can exit the configuration by clicking the X icon in the top-right corner.
2. Configuration Parameters
To generate the report, the user must define the following criteria:
A. Report Period
This section determines the timeframe for the data extraction:
- Month: A dropdown selector used to choose the specific month (e.g., December).
- Year: A text entry field to define the fiscal year (e.g., 2025).
B. Target Moves
Users can filter the accounting records based on their status:
- All Posted Entries: Filters the report to include only finalized and validated journal entries.
- All Entries: Includes all records, including draft and unposted entries.
C. Display Preferences
- Display Debit/Credit Columns: A checkbox that, when toggled on, includes detailed debit and credit columns in the output rather than just the net balance.
3. Action Buttons
The footer provides multiple processing and export options for the configured data:
Action Result
Print Generates a printer-friendly version of the credit information report.
Download Excel Exports the data into an .xlsx format for spreadsheet analysis.
Download XML Exports the data in a structured XML format for system portability.
Discard Closes the modal and cancels all unsaved changes.
F05-Restructured Category Credit Information
Restructured Category Credit Information Report
Based on the interface provided, this report serves as a specialized financial export tool within the accounting module to generate credit information summaries for specific reporting periods.
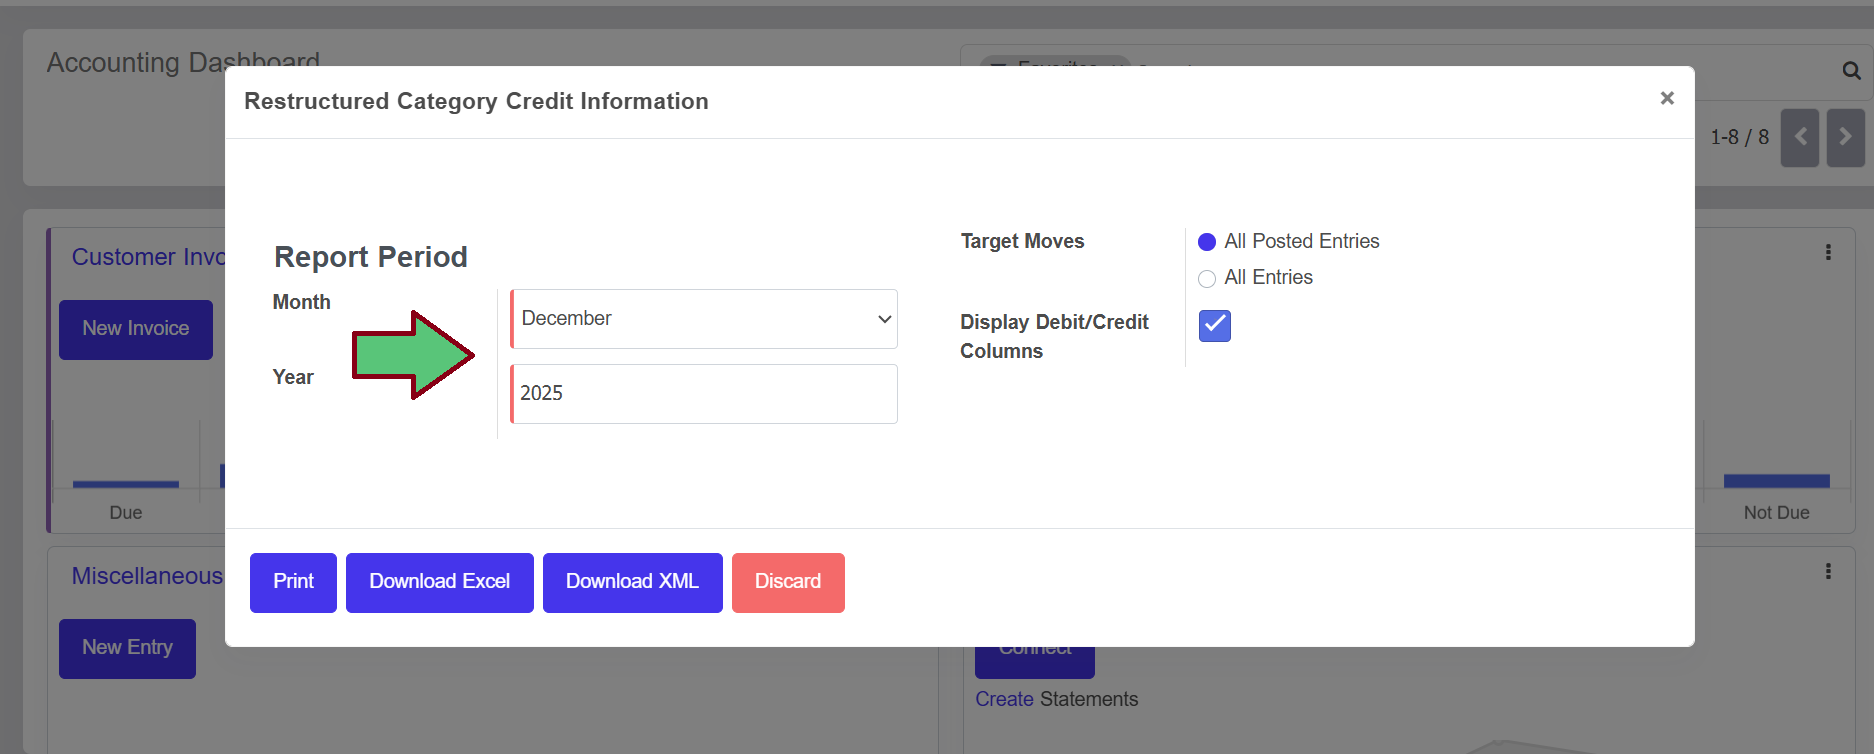
Overview
The Restructured Category Credit Information tool allows users to extract credit data, likely for regulatory compliance or internal audit purposes. It provides options for specific time-filtering and data-depth selection.
Configuration Options
- Report Period: * Month: Select the specific month for the data pull from the dropdown menu (e.g., December).
- Year: Define the fiscal year for the report (e.g., 2025).
- Target Moves:
- All Posted Entries: Filters the report to include only finalized and validated journal entries.
- All Entries: Includes both posted and draft/unposted entries in the report.
- Display Debit/Credit Columns: A checkbox that, when enabled, separates financial data into distinct debit and credit columns for more detailed ledger analysis.
Action Commands
Action Result
Print Generates a standard PDF version of the credit information.
Download Excel Exports the data into a .xlsx format for manual analysis or pivot table creation.
Download XML Generates a machine-readable file, typically used for uploading to regulatory portals or external audit software.
Discard Closes the window without generating a report or saving changes.